Greetings
This is Ong Yue Huei (AJ), an iOS software engineer at Money Forward, Inc.‘s Tax Return Group.
Background
I’m one of the iOS engineers of Money Forward’s Tax Return app. The app allows users to do bookkeeping, electronically submit Tax Return, Consumption Tax Declaration, and more.
Money Forward Cloud Business Registration (マネーフォワード クラウド開業届) is one of the services in the Money Forward Cloud Series. Two months ago, it was integrated into our app! 🎉 Here’s the Press Release (Note that the linked content is only available in Japanese).
Similar to Tax Return and Consumption Tax Declaration, the submission of these required NFC on mobile devices to read the My Number card. Hence, with this new integration, users can now electronically submit their business registration using our app.
Now that users can submit using NFC on mobile devices, we will need to redirect users who have filled out the necessary information for business registration on the web to our app.
Here is how one of the redirections works:
- The user fills out all the necessary information for starting a business on the web.
- Subsequently, user is shown a QR code to scan (or a download button, in case of mobile devices) to proceed to the next step.
- When the URL of this previous step is accessed, redirection occurs:
a. If our app is already installed:
i. It will open automatically and redirect the user to the submission view.
b. However, if our app has not yet been installed:
i. The user will be directed to the app store for installation.
ii. Once the user opens our app after installation, they will be automatically redirected to the submission view.
How do we meet the aforementioned requirement? With deep linking!
There are various tools out there, such as Adjust, Firebase, etc., that ease the process of implementing deep linking in our projects. Depending on your project’s needs, your team, and specific requirements, you’ll need to choose the one that suits you best.
In this article, I’d like to delve into the HOW of implementing deep linking in iOS app with Adjust. Hopefully, by the end of this article, you will grasp the entire idea of how the implementation works.
Deep Linking
Before we dive into it, let me give you a brief introduction to the popular methods used to configure deep linking in iOS:
- Custom URL Scheme Method
- This method only supports redirection when our app is installed and won’t behave properly if our app is not installed. However, we are free to define our own scheme, which is one of its benefits. For example:
some-scheme://.
- This method only supports redirection when our app is installed and won’t behave properly if our app is not installed. However, we are free to define our own scheme, which is one of its benefits. For example:
- Universal Links Method
- Unlike the above method, this approach uses an HTTPS URL. It allows redirection to destinations both inside and outside of the app, such as the App Store or Safari, depending on whether the app is installed or not. Plus, it’s more secure because some security mechanisms exist to ensure that only our app can trigger on our domain’s URLs.
There are two types of deep links that I will be mentioning in this article:
- Direct Deep Link
- The app is already installed.
- When the user comes from the deep link, they will be redirected directly to the specific view in the app.
- Deferred Deep Link
- The app is not installed. (So, as you may have noticed, this can only be implemented using Universal Links.)
- After coming from the deep link, the user will be redirected to the App Store for app installation.
- Once the user opens the app after installation, they will be automatically redirected to the specific view in the app.
That’s all for the introduction. Before we proceed, I’m assuming you’re already familiar with Adjust or have integrated it into your app. If not, I recommend setting up Adjust in your app first.
Alright, let’s get started.
The HOW
First things first, head to the new Adjust suite and create an app. It’s beneficial to have separate production and debugging apps so you can play around with the debugging app’s setup in Adjust without affecting the production setup. However, please ensure you have the Admin role in order to create an app. For now, let’s create an app for the debugging environment.
The examples that I will be providing in this article are from the new version of the Adjust suite, if you’re still using the older version, let’s switch to the new Adjust suite.
In the newly created app, create an iOS platform.
iOS Platform Setup
App ID
Enter the Apple ID of our app for the App ID
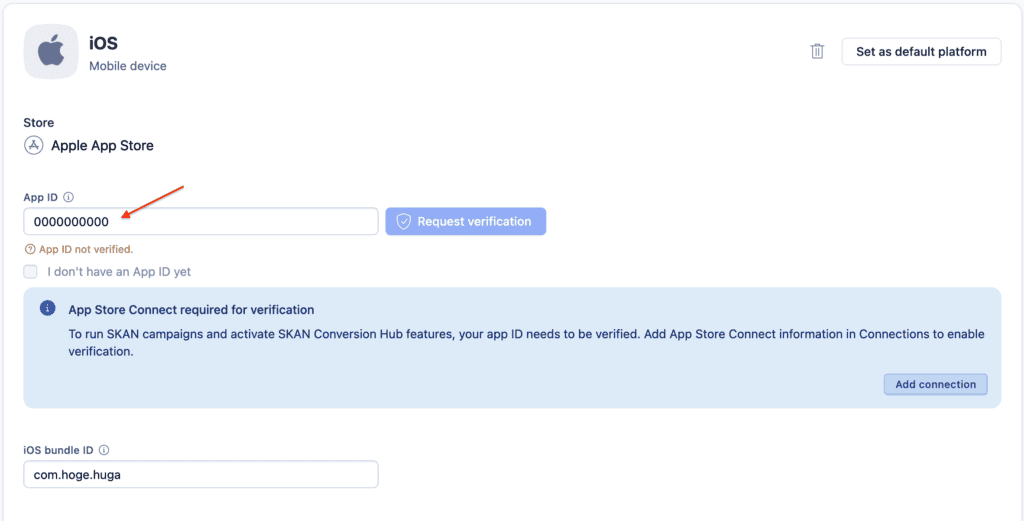
We can find it in our App Store Connect, as illustrated below.
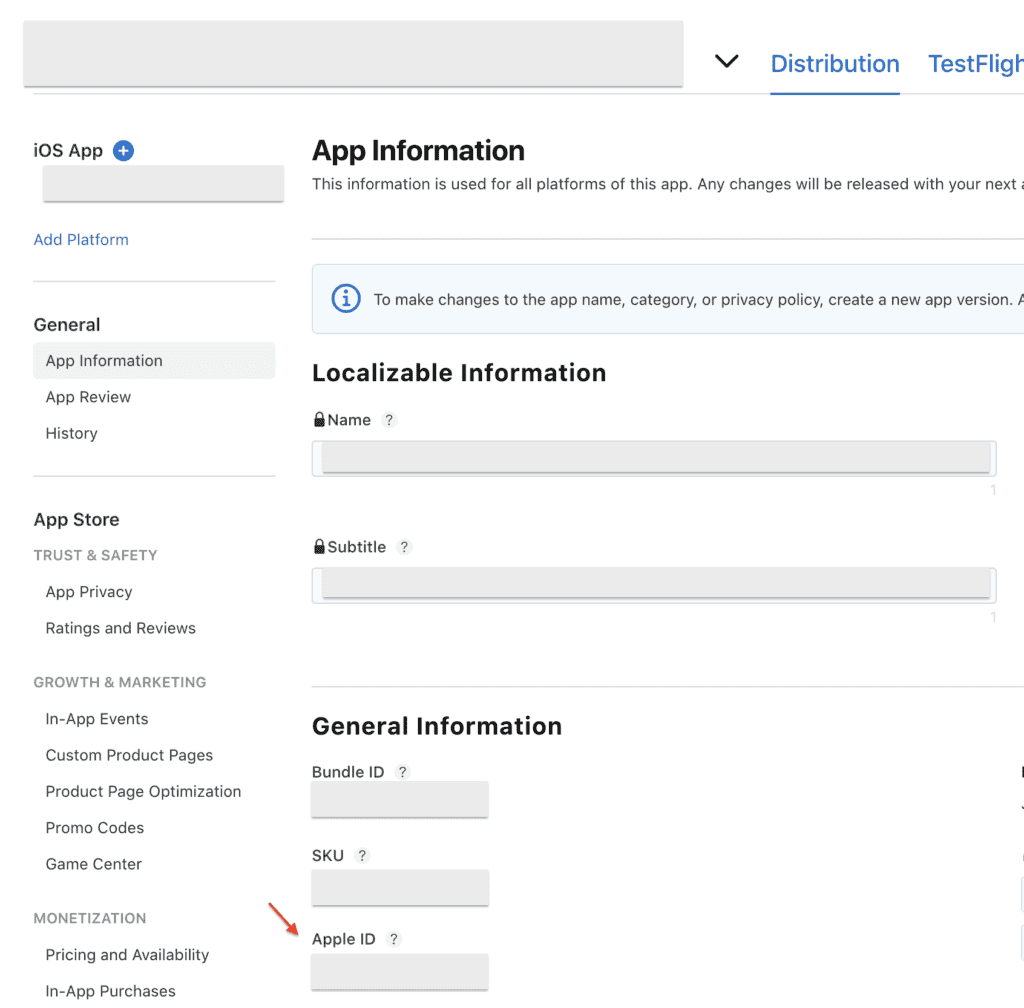
Since we are creating this for our debugging environment, simply use any dummy ID. It won’t redirect to the correct app in the App Store, but that’s okay because we’ll be building our app with Xcode after accessing our deep link.
iOS bundle ID
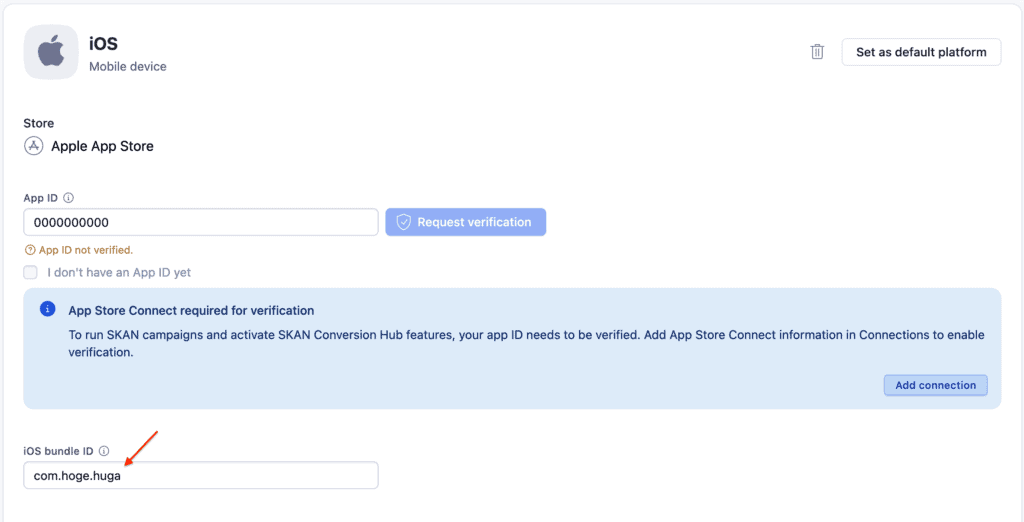
We can find the bundle ID either
(1) in Xcode by navigating to Target > Signing & Capabilities > Debug > Signing > Bundle Identifier.
Ref: https://help.adjust.com/en/article/retrieve-data-points-ios#debug-bundle-id

or, (2) in our App Store Connect account by navigating to General > App Information > General Information.

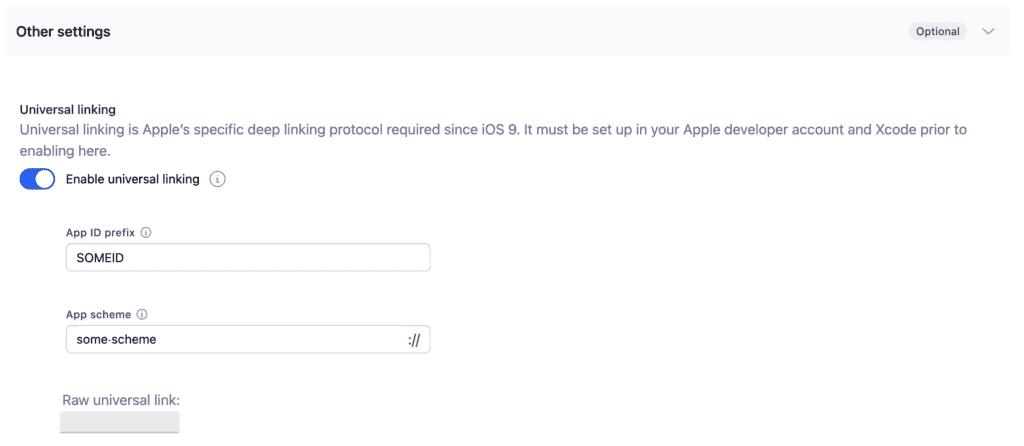
Universal Linking
Enable the universal linking. Once it is enabled, proceed to set the App ID prefix and App scheme.
We can find the App ID prefix here, under Membership details > Team ID.
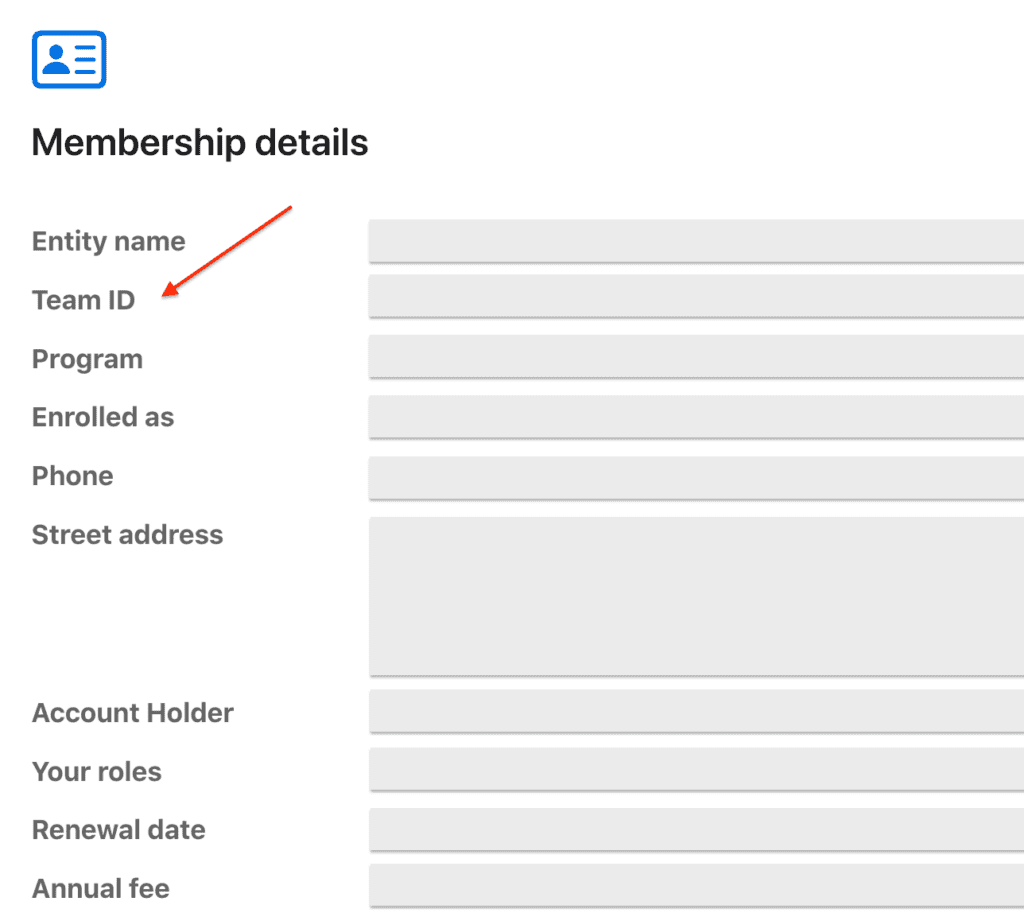
For the App scheme, define our own scheme. This scheme will be used in setting up Xcode later if we choose to use the custom URL scheme.
Don’t forget to copy the Raw universal link as it will also be used in Xcode.
Xcode Setup
Before we proceed further, let’s open Xcode for some setup.
Now, remember the two methods I mentioned at the beginning of the article: the Custom URL Scheme Method and the Universal Links Method.
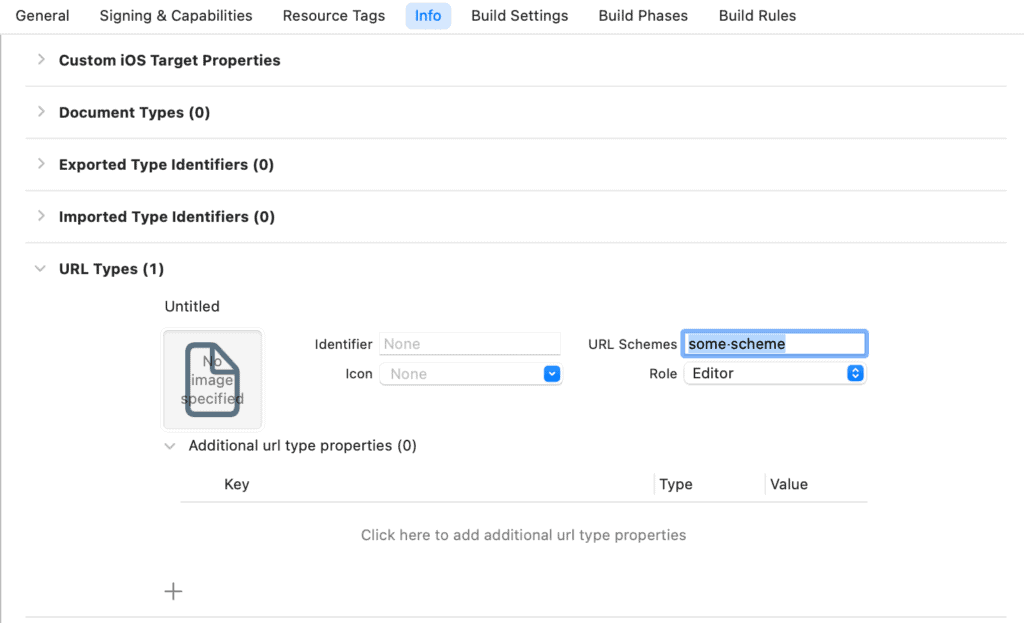
Custom URL Scheme Method
Go to Target > Info > URL Types > URL Schemes > Enter the scheme that we’ve defined earlier in the App scheme.
Universal Links Method
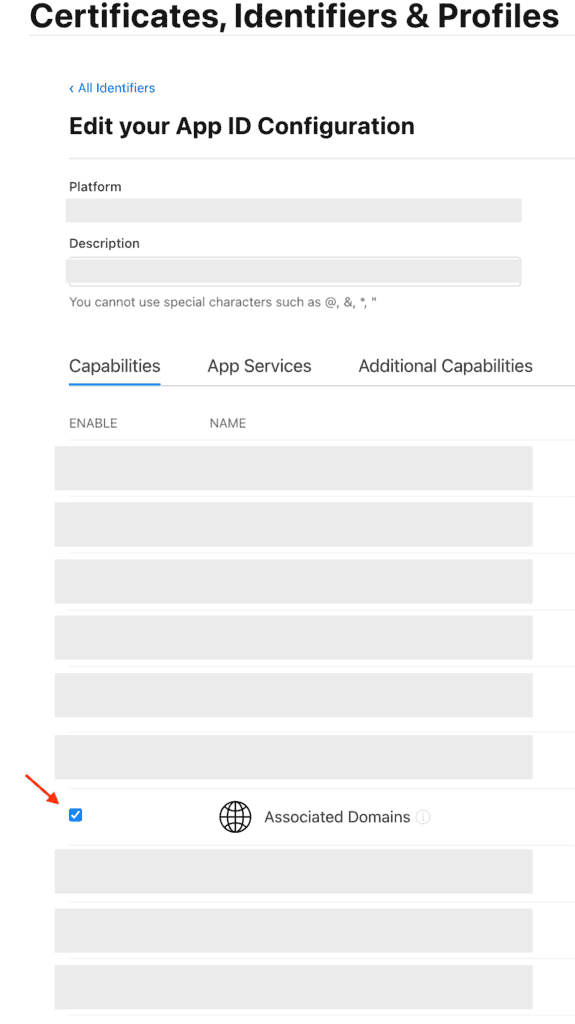
Go to Target > Signing & Capabilities > Associated Domains (add one if haven’t) > Set the Raw universal link as shown in the example below.

Since we will be using associated domains, we need to enable it in our App Store Connect account as well. Simply check the checkbox as shown below.
Ref: https://help.adjust.com/en/article/set-up-direct-deep-linking-ios#enable-associated-domains
By now, we should be able to open our app if we access our deep link. So let’s create one.
Back to Adjust, we are now going to create our custom link.
Custom Link Creation
Under Campaign Lab > Custom links > click the + New link located at the top right corner.
(1) App selection > Choose an app for our link.
The app should be the one that we created at the very beginning of this article.
(2) Link structure > Give a name for your link.
It can be any name, and you can still edit it later.
(3) User destinations > Define a deep link > In-app screen.
Note that the iOS app scheme has the same value as the Raw universal link.
You can set the iOS app screen as shown in the example provided by Adjust.
Leave the other settings as default and proceed to the next step.
(4) Attribution settings > Go to next.
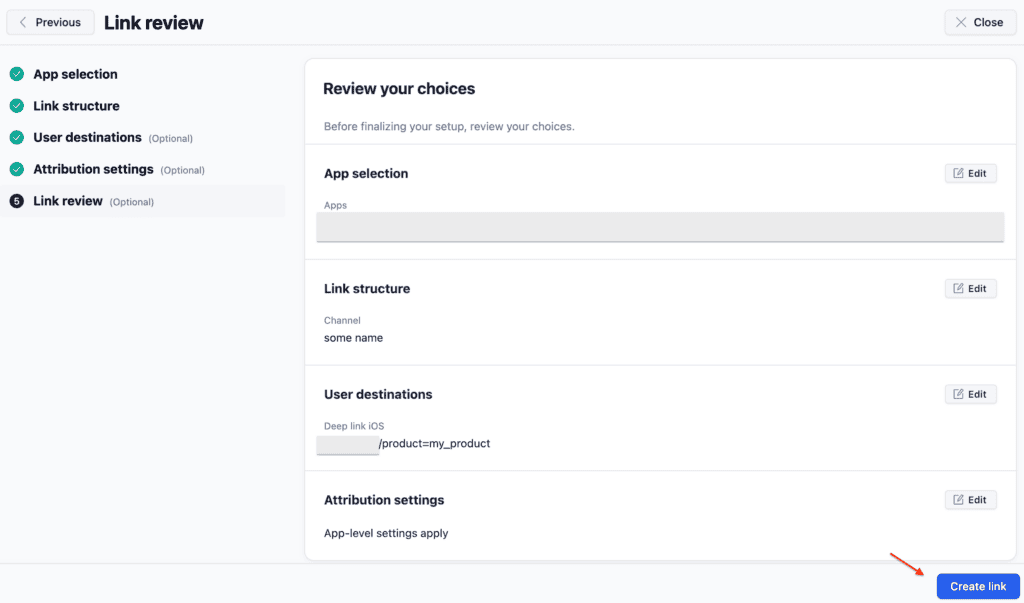
(5) Link review > Create link.
Keep in mind that the deferred link in Adjust only works the first time due to its attribution settings. Once a device has been attributed to a specific campaign, it can’t be reattributed again. This means that if the user uninstalls the app and reinstalls it in the future, and then performs the deep link action (clicking the deep link or scanning the QR code) again, the deferred deep link will not work. As a result, the user will not be redirected to the specific view.
To test the deferred link on the same device during development, it is necessary to remove the past attributions.
Open the testing console:
- AppView > All apps > YourApp, Testing console (located at the bottom right corner).
- or, AppView > All apps > YourApp > Data management > Testing console > Open.
You will now see a text field where you can enter an Advertising ID.
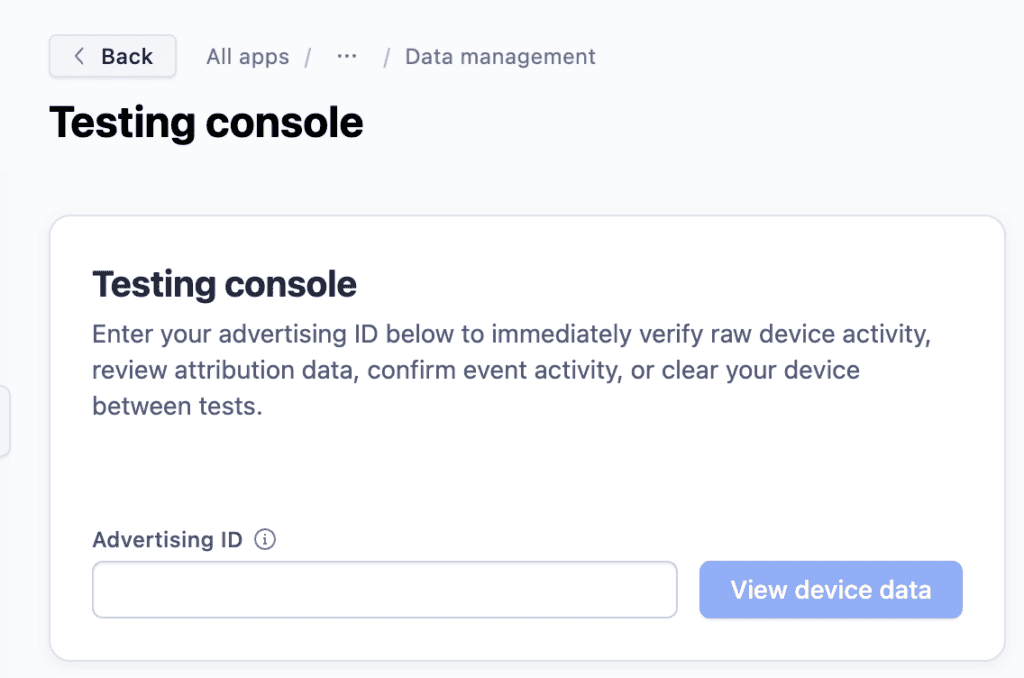
It is the Adjust device identifier (ADID), which you can obtain from your Xcode’s console log. I’ll show you how to enable the log soon. For now, just keep this in mind: after entering the ADID, click View device data and then Forget Device.
Code Setup
Note that we will not be using Scenes in this article, if you intend to use it, please refer here.
Direct deep link
Let’s handle the URL received when the user, with the app installed, comes from the universal link at application(_:continue:restorationHandler:) method.
We are going to:
- Send the URL to Adjust backend.
- Inform our app that the user came from a deep link.
If url.host matches your.raw.link and url.path matches what we set in the iOS app screen, then the user is coming from the Adjust’s deep link that we set.
Code example:
func application(
    _ application: UIApplication,
    continue userActivity: NSUserActivity,
    restorationHandler: @escaping ([any UIUserActivityRestoring]?) -> Void
) -> Bool {
    guard let url = userActivity.webpageURL else { return false }

    Adjust.appWillOpen(url)

    if url.host == "your.raw.link" && url.path == "/product=my_product" {
        // Handle the deep link
        ...
    }
    ...
}
Deferred deep link
We will need to set the app token and environment for this.
- Retrieve the app token from the Adjust suite.
- Set the environment to
ADJEnvironmentSandboxfor debugging orADJEnvironmentProductionfor production. - Set the log level and delegate of the
ADJConfigclass as shown below:
let config = ADJConfig(appToken: "token-from-adjust-suite", environment: ADJEnvironmentSandbox)
config?.logLevel = ADJLogLevelVerbose
config?.delegate = self
Adjust.appDidLaunch(config)

...

func adjustDeeplinkResponse(_ deeplink: URL?) -> Bool {
    true
}
Return true for the adjustDeeplinkResponse method so that the Adjust SDK will call the open(_:options:completionHandler:) method for us.
Once you open your app through the deep link, the ADID will be printed in the console log. That’s where you retrieve the ADID. Here’s an example of how it looks:
2022-09-28 09:19:35.609913+0900 example[1619:241847] [Adjust]v: Response: {"app_token":"2eb2na2w54c3","adid":"4446ab34861b99b78ee374c3bd38a350","timestamp":"2022-09-28T00:19:35.841Z+0000","message":"Attribution found","attribution":{"tracker_token":"abc123","tracker_name":"Organic","network":"Organic"}}
Ref: https://help.adjust.com/en/article/test-deep-links-ios#test-deferred-deep-linking
Now, let’s handle the URL received when the user opens the app after installation in the application(_:open:options:) method.
We are going to:
- Send the URL to Adjust backend.
- Inform our app that the user came from a deep link before the installation.
If url.host matches what we set in the iOS app screen, then the user is coming from the Adjust’s deep link that we set.
Code example:
func application(
    _ app: UIApplication,
    open url: URL,
    options: [UIApplication.OpenURLOptionsKey: Any]
) -> Bool {
    Adjust.appWillOpen(url)

    if url.host == "product=my_product" {
        // Handle the deep link
        ...
    }
    ...
}
My approach is to create a flag to identify if the app was opened from the deep link. However, depending on your requirements, you are free to decide how to handle this piece of information.
I would also recommend enabling the Adjust log just for debugging purposes and retrieving the ADID. Once the implementation is completed, disable it by removing config?.logLevel = ADJLogLevelVerbose so that it won’t clutter the console log.
Closing
By now, you should have a good grasp of the overall concept of how deep linking works in Adjust.
I hope this article will serve as a valuable reference for you as you create your own working deep links.
As always, thanks for reading and happy coding!
