
Unlock the power of seamless data synchronization between microservices with this guide on leveraging AWS DMS. Dive into practical tips and step-by-step instructions to ensure your microservices communicate flawlessly. This is the way we use for Data migration in real micro-services in projects at MFV.
Table of contents
Requirement/ Problem
- SCI-Receiver service needs to view the
send-invoice-historyof the SCI service - SCI service needs some information from SCI-Receiver service also
- We need some job to sync data with a near real-time delay
Solution (We will choose Solution #1)
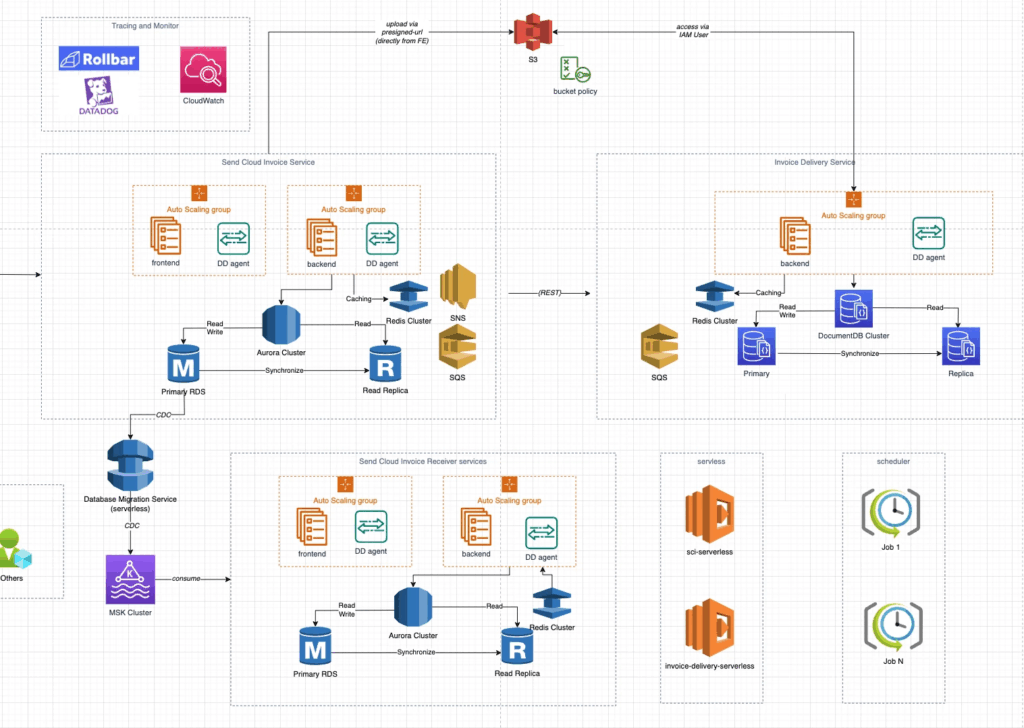
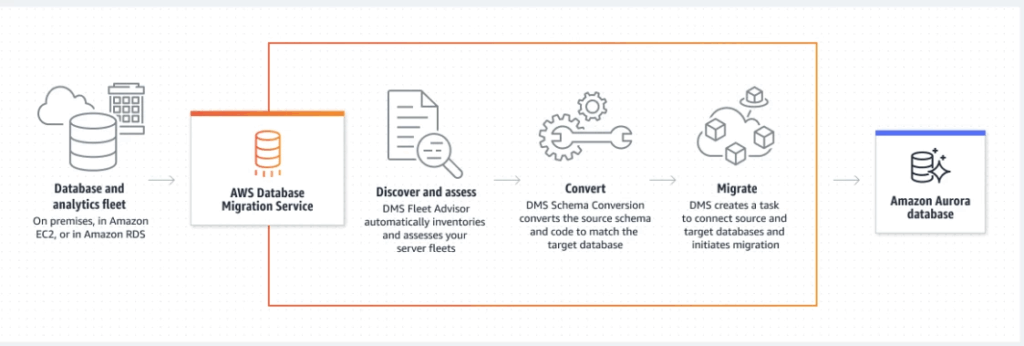
#1: Solution 1: Using AWS Data Migration Service
Pros:
- AWS DMS is a fully managed service, which means that AWS takes care of the underlying infrastructure and maintenance, allowing you to focus on your data migration and replication tasks.
- AWS DMS supports a wide range of source and target databases, including popular databases like MySQL, PostgreSQL, Oracle, and SQL Server, among others.
- AWS DMS provides a low-latency data replication solution, allowing you to replicate data changes in near real-time.
- AWS DMS supports both one-time and ongoing data migration and replication tasks, giving you the flexibility to choose the best approach for your use case.
Cons:
- AWS DMS can be expensive, especially if you are replicating large amounts of data or running multiple replication tasks simultaneously.
- AWS DMS can be complex to set up and configure, especially if you are not familiar with the service or the source and target databases.
- AWS DMS may not support all the features of your source or target database, which could result in data loss or corruption if not properly handled.
- AWS DMS may not be the best solution for certain use cases, such as those that require complex data transformations or custom logic.
To customize the convert logic step in AWS Data Migration Service (DMS) with Java, you can create a custom user-defined function (UDF) and use it in your DMS task.
Here are the high-level steps to create a custom UDF:
- Create a Java class that implements the
com.amazonaws.services.dms.sdk.functionality.UserDefinedFunctioninterface. - Implement the
applymethod of theUserDefinedFunctioninterface. This method takes the source data as input and returns the converted data. - Package the Java class into a JAR file.
- Upload the JAR file to an Amazon S3 bucket.
- Create a DMS task and specify the S3 bucket and key where the JAR file is located.
- Specify the UDF name in the DMS task settings.
Note: You can connect the target DB in UDF by using JDBC connection
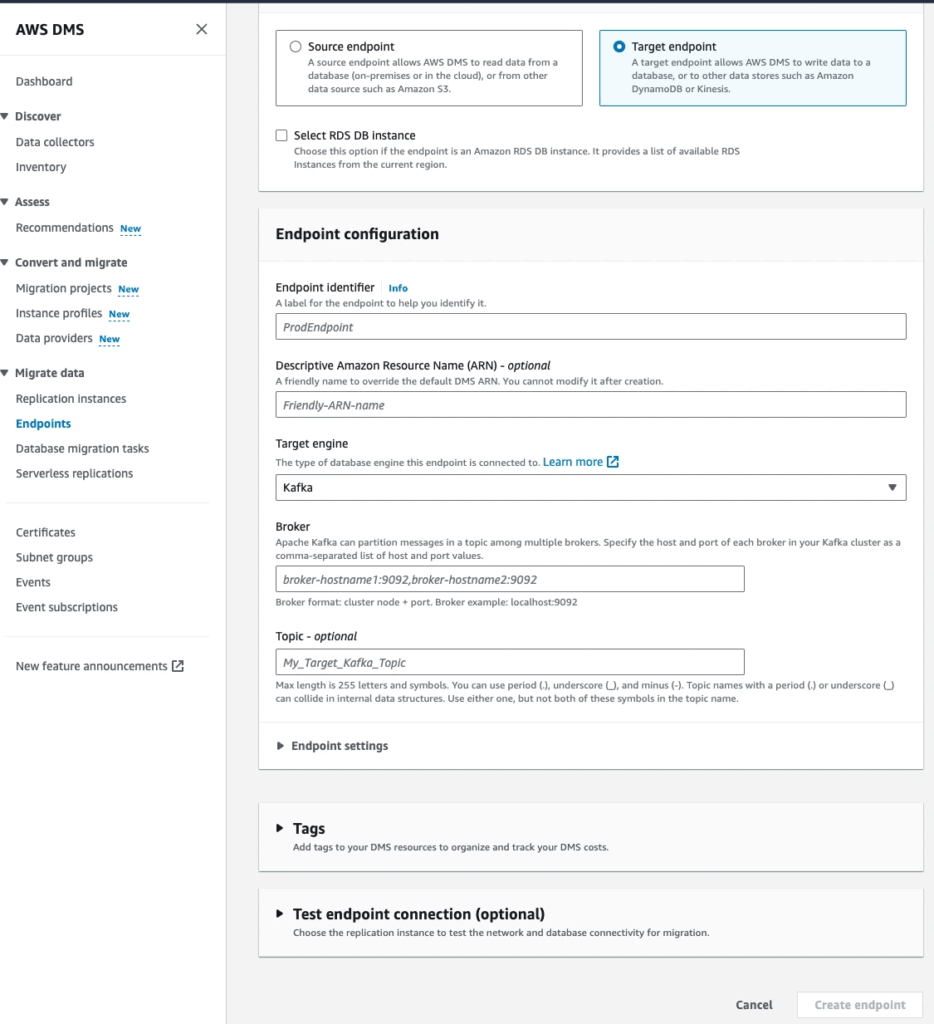
How to setup DMS:
Step 1: Create endpoint:
Go to AWS DMS Console and access Endpoints menu. Create 2 endpoints
⚠️ Note: You need to use user that have full PRIVILEGES from both sides: source and target endpoint
Source: This is source DB
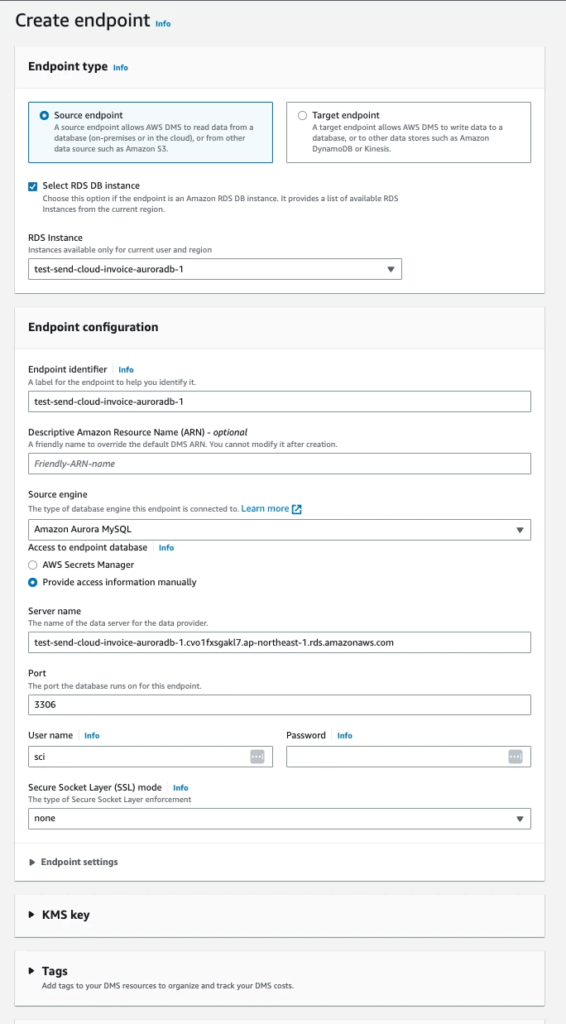
Target: This is the target DB
Step 2: Create role name dms-cloudwatch-logs-role for DMS write log to cloudwatch:

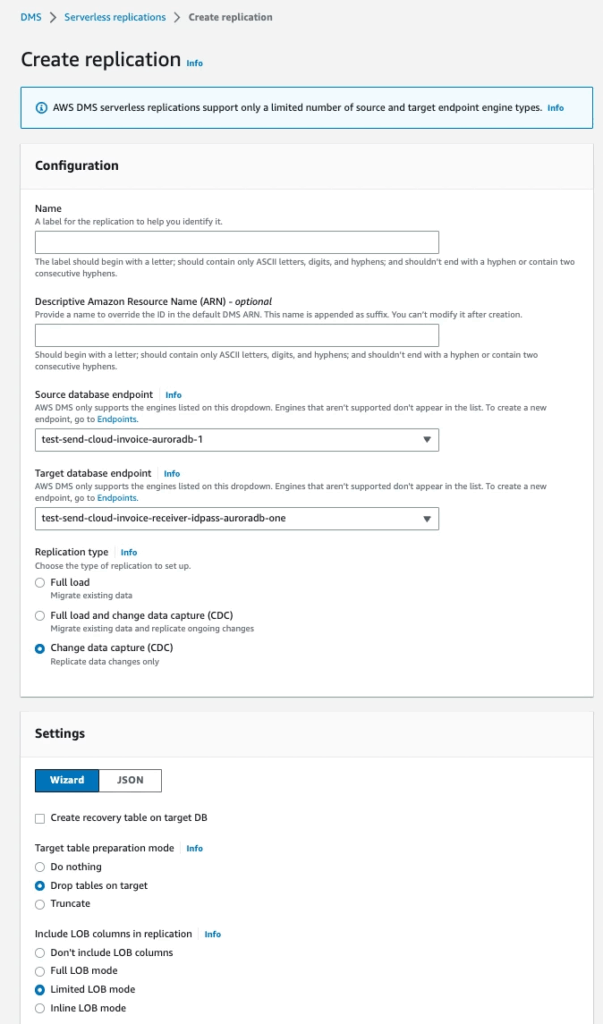
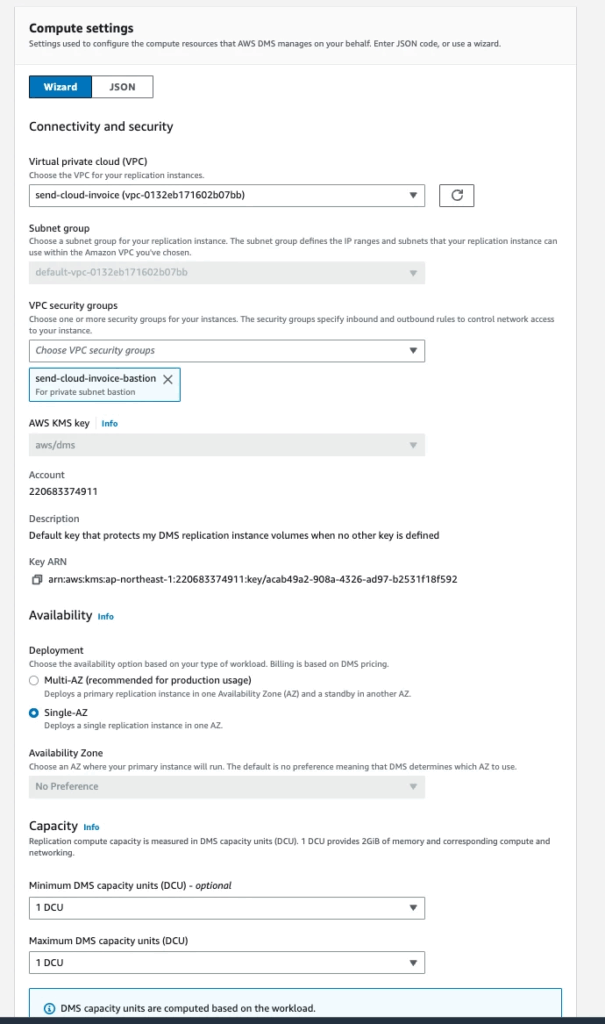
Create Serverless replications:
Step 3: Access Serverless replications menu
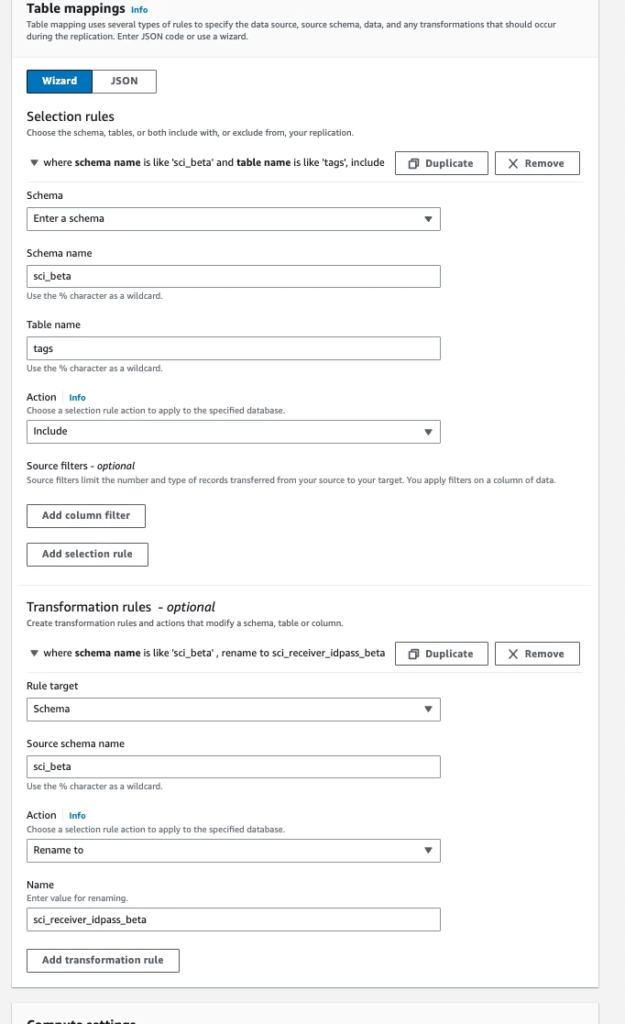
Note that you need config Transformation rules with:
- schema name: Source DB’s schema
- Table name: Table you want to sync
- Action: Include
- Rule target: Schema
- Source schema name: Source DB’s schema
- Action: Rename to
- Name: Target DB’s schema
After creating Replication Serverless, click on serverless you just created, and choose Action ▶️ Start

OR you can set up the Target source as a Kafka cluster
After running this solution for a while, we realized that it was not a cost-optimize solution, so we decided to change it to create multiple Database migration tasks and it saved ~400 usd a month
#2: Solution 2: Using MSK Connector
⚠️ Note: We cannot use this solution because MSK Connector does not support SCRAM authentication mode yet. And MSK Cluster from MFJ now forces authentication via this method
Step 1: Completed MSK Connector, MSK Cluster setup, run sci_receiver_backend service
Step 2: Run job migrate old DB from sci_backend to sci_receiver_backend:
- Scan all old data
- Transform old data and insert it into
transaction_outboxtable MSK Connectorwill capture data change and produce a message to theMSK Cluster- Message payload:
{
  "sentAt": 1686110218,
  "senderOfficeName": "MFV-HN",
  "destinationCode": "CUST-001",
  "senderCustomerId": "001",
  "senderOfficeId": "MFV-HN-01",
  "forms": [
    {
      "fileName": "abcd.pdf",
      "filePath": "file://sci/",
      "size": 1,
      "invoiceNumber": "INVC-001",
      "issueDate": 1686110218222,
      "totalAmount": 1500,
      "senderFormId": 1
    }
  ]
}
HLD for Setup MSK Cluster and MSK Connector to capture data change:
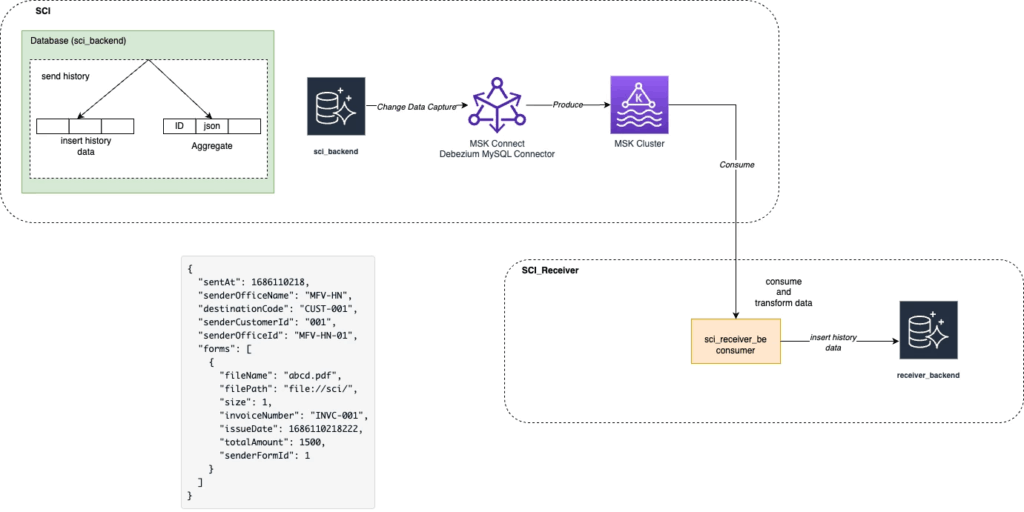
History Form Data will be aggregated and inserted into aggregate_history_form then MSK connector will capture data change and produce to MSK Cluster
When do we trigger the aggregate history form?
After sending the invoice via web-sending-id-pass, we will insert aggregate_history_form into DB. If it fails, the service will produce it to DLQ for retry
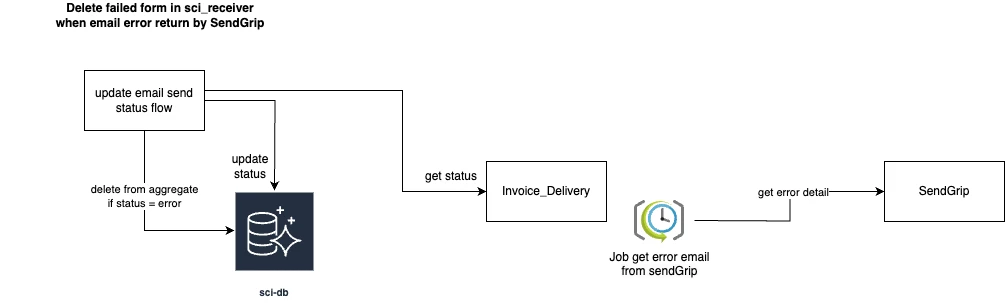
Because the default status of sending email is SENT this history will be synced to sci_receiver but this may not final status of this email. After sending an email, we have 1 job that scans error email from 3rd party, and it will update the final status of sending an email. If this status is ERROR, then we need to remove this history from sci_receiver. Below is a solution for this:
- Use
MSK Connectorto capture data change and produce toMKS Cluster
SCI-Receiver will consume and transform data
Pros:
- Fully control what record will be synced, data redundancy not happen
- Cost effective
- Easy to control and customize convert, transform logic
- No need to setup MSK cluster, because it’s already set up by MFJ
Cons:
- Take time to develop
You can specify the table list to be synced by the Debezium connector in the connector configuration file. Here’s an example of how you can do it:
{
  "name": "mysql-connector",
  "config": {
    "connector.class": "io.debezium.connector.mysql.MySqlConnector",
    "tasks.max": "1",
    "database.hostname": "localhost",
    "database.port": "3306",
    "database.user": "mysqluser",
    "database.password": "mysqlpw",
    "database.server.id": "1",
    "database.server.name": "my-app-connector",
    "database.whitelist": "mydatabase",
    "table.include.list": "mydatabase.mytable1,mydatabase.mytable2",
    "database.history.kafka.bootstrap.servers": "localhost:9092",
    "database.history.kafka.topic": "schema-changes.my-app-connector"
  }
}
In this example, the table.include.list property is set to mydatabase.mytable1,mydatabase.mytable2, which means that only mytable1 and mytable2 tables from the mydatabase database will be synced.
Links: