
Preface
Hi there! My name is Muhammad Garebaldhie. I’m a software engineer passionate about infrastructure and cloud technologies. Recently, I’ve been exploring different development environments and tools, including my journey with Neovim API in Cursor. Today, I want to share another adventure – building my own Kubernetes cluster at home.
I recently had an idea to deploy my projects on the cloud using Kubernetes. After browsing several cloud providers, I was shocked by the costs – they charge around $0.1 per hour for the lowest tier support:
- Google Cloud: $101 (¥15,000) per month for 0.25vCPU and 1GiB of RAM
- Amazon EKS: $70 (¥10,350) per month for the same specification
That’s when I had a lightbulb moment. While browsing Amazon, I found they sell very decent mini PCs for a fraction of the cloud costs: BMax Mini PC Turbo with these specifications:
- DDR4 16 GB
- 512 GB SSD
- 4 Core
Comparing this to Google Cloud with the same specs – it would cost around $280 (¥41,500) per month! That’s when I realized: why pay thousands of dollars when I could build my own server for a fraction of the cost?
This article will show you how to build your own Kubernetes cluster at home using unused or new computers. It’s not just about saving money – you’ll learn a ton about infrastructure, get full control over your environment, and have a “production-ready” setup that you can experiment with freely.
Of course to create a “production-ready” cluster you need a lot of security and best practice about hardening kubernetes cluster. But i believe that by creating your own cluster, it would help you understand the concept better.
Table Of Content
- Let’s Build Our Own Kubernetes Cluster
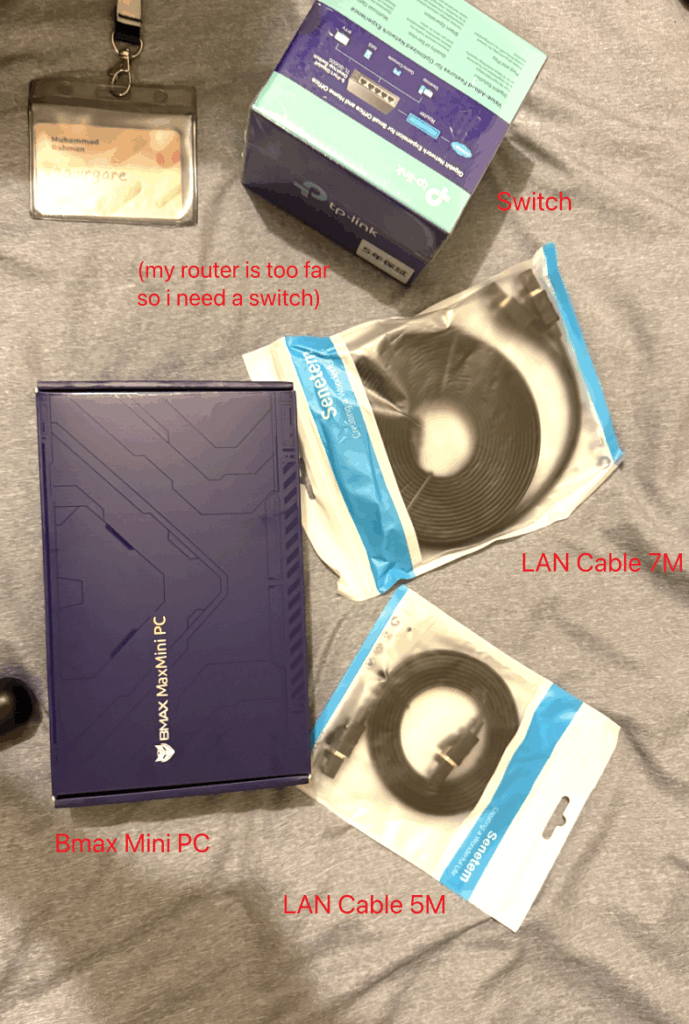
What you need
- Unused Computer/Mini PC
- Internet Connection
- Router/Switch [Optional]
- LAN [Optional] – this method is preferred since it’s easy to do; most machines have an eth0/LAN interface
- If your machine has a wireless network card interface, then it should be fine
- USB Flash drive 4GB or more
Goal
Our goal is simple: set up a Kubernetes cluster on our home machine and verify it works by deploying an Nginx pod. But first, we need to choose which “flavor” of Kubernetes to use.
Think of it like choosing between a bicycle and a motorcycle – both get you where you need to go, but one is simpler for learning while the other is built for serious work. Let me break down the options:
For Development
These are perfect for learning and development. They’re super easy to set up but not meant for production use. Why? Because they typically run on a single machine, so if that machine goes down, your whole cluster goes down too.
Most of these run as Docker containers on your local machine, so you’ll need Docker installed first. I’ve tried all of them, and Kind is my favorite because you can easily create multi-node clusters with simple YAML configuration. There are other development options, but these are the most popular ones.
Production Ready
These are the real deal – designed for production use. They can run across multiple machines, so if one fails, your applications keep running. Perfect for what we’re building!
Actually, there are many more flavors than I listed above, but I have personally tried K3s, Talos, and MicroK8s.
| Comparison | Talos | K3s | MicroK8s |
|---|---|---|---|
| Size | Very Small | Moderate | Quite Big |
| Type | Bare-metal OS | Binary | Snap |
| Installation | Quite Complex | Simple | Simple |
| Features | Minimal | Moderate | Rich |
Note
Why I say Talos is minimal is because if we compare the default installation of Talos with K3s and MicroK8s, Talos only has the basic features that are needed to run Kubernetes. While K3s and MicroK8s have a lot of features such as storage, ingress, dashboard, etc. that are installed by default.
This Video explains different flavors of Kubernetes, pros and cons.
I found Talos to be the most fascinating option. Here’s why: Most Kubernetes setups run on top of a regular operating system like Ubuntu or Debian. But Talos IS the operating system – it’s purpose-built just for running Kubernetes. No unnecessary software, no package managers, no bloat. Just Kubernetes.
This means it’s incredibly secure, fast, and reliable. Perfect for our homelab experiment!
I found an amazing video that that explains different flavors of Kubernetes, pros and cons, you can check it out for more details!
Plan
Here’s our game plan: We’ll use Talos as our Kubernetes flavor, but instead of installing it directly on our hardware, we’ll use Proxmox as a hypervisor. Think of Proxmox as a free, open-source version of VMware – it lets us create and manage virtual machines easily through a web interface.
This approach gives us several advantages: we can easily create multiple VMs, take snapshots, and manage everything through a clean web interface.
Note: Why don’t we use Windows and use VirtualBox or VMware Workstation? Actually, you can, but it might be more limited and harder since the virtualization is not at the kernel level. Besides that, I want to have a more production-like environment, so I want to learn how to use Proxmox since it’s a popular hypervisor in the industry.
Here’s what we’ll do step by step:
- Install Proxmox on our machine (this becomes our hypervisor)
- Create Talos VMs inside Proxmox (our Kubernetes nodes)
- Configure the Kubernetes cluster (connect the nodes together)
- Deploy a test application (verify everything works)
Setup Proxmox
- Download Proxmox ISO from here – I use the latest version
Proxmox VE 9.0 - Prepare a USB stick with at least 4GB capacity
- Burn the ISO to the USB stick using Rufus for Windows or balenaEtcher for macOS. I haven’t tried using a Linux computer to burn the ISO, so you can try it yourself. Official Guide from Proxmox
- After the burning process is complete, plug the USB stick into the machine where you want to install Proxmox
- Restart the machine and enter the BIOS/UEFI settings. For the BMax Mini PC Turbo, you can spam the delete button after restarting the machine
Note: Different hardware has different ways to enter the BIOS/UEFI settings. You can search on Google by searching
how to enter bios/uefi settings on <your hardware>
- Change the boot order to boot from the USB stick first to install it
- In the first prompt, you will be asked to input username, password, and email
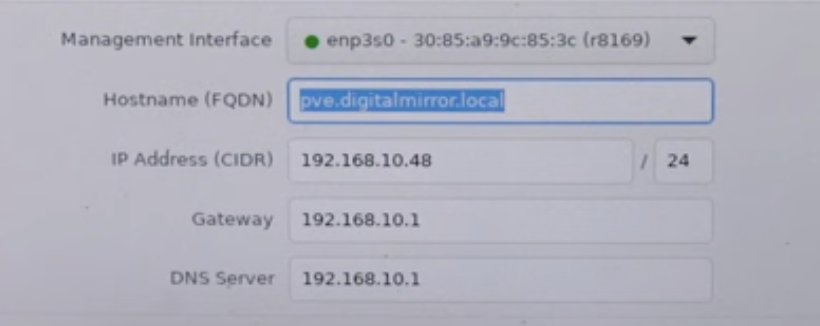
- After this, you will be prompted to input FQDN, IP Address, Gateway, and DNS Server. See the Proxmox – Network section for more details
- After this, you can hit next and let the installer boot the Proxmox OS
After the installation is complete, you will be prompted with a login form. Proxmox by default will provide a UI interface at http://IP:8006.
Note: The default
usernameisroot. The password is the one you entered during the installation
Proxmox – Network
You’ll need to configure these network settings:
- FQDN (Fully Qualified Domain Name): This is a hostname for your Proxmox server. You can use anything like
citadel.gawrgare.home(that’s what I used) - IP Address / CIDR: The IP range for your Proxmox server
- Gateway: How your router connects to the internet (usually ends with
.1, like192.168.0.1) - DNS Server: Usually the same as your gateway
Note: DHCP Server is a mechanism used by the router to assign an IP to a device. It uses a lease mechanism to give machines an IP from the available list
Tip: Make sure to reserve some IP addresses in your router’s DHCP settings so they don’t assign the IP that you’re using with your Proxmox.
You can see these sections to fill the informations above
MacOS
- Go to Settings and find
WiFi Setting - You can find the IP Address and Router here.
Or you can enter ifconfig in the terminal, and it will output the same result
Windows
For Windows, you can use ipconfig -a
Linux
For linux, you can use ip a commands to see all of the network interface
Tip:
- You can visit the No IP Website for details on how to get your IP.
- You can find more details about Proxmox in their official Proxmox Installation Guide and also this video explaining how to install Proxmox step by step
Setup Talos
After the Proxmox installation is completed, now we need to install Talos inside Proxmox.
There are two ways to set up virtual machines in Proxmox: Manual via UI and Installing via Terraform. In this guide, I will show you both ways. My personal preference is to use Terraform since it’s more reproducible and easy to manage. But if you are new to Terraform, then you can use the manual via UI method.
Manual via UI
To install manually, we can start by logging into the web interface that Proxmox provides. And download the OS
efb7577422715f84c716c3d30fee60858fb093841d1d539ca5db92ae99737bf8- Talos is very nice and gives us options to choose via Image Factory
- If you’re not sure, just pick the default image
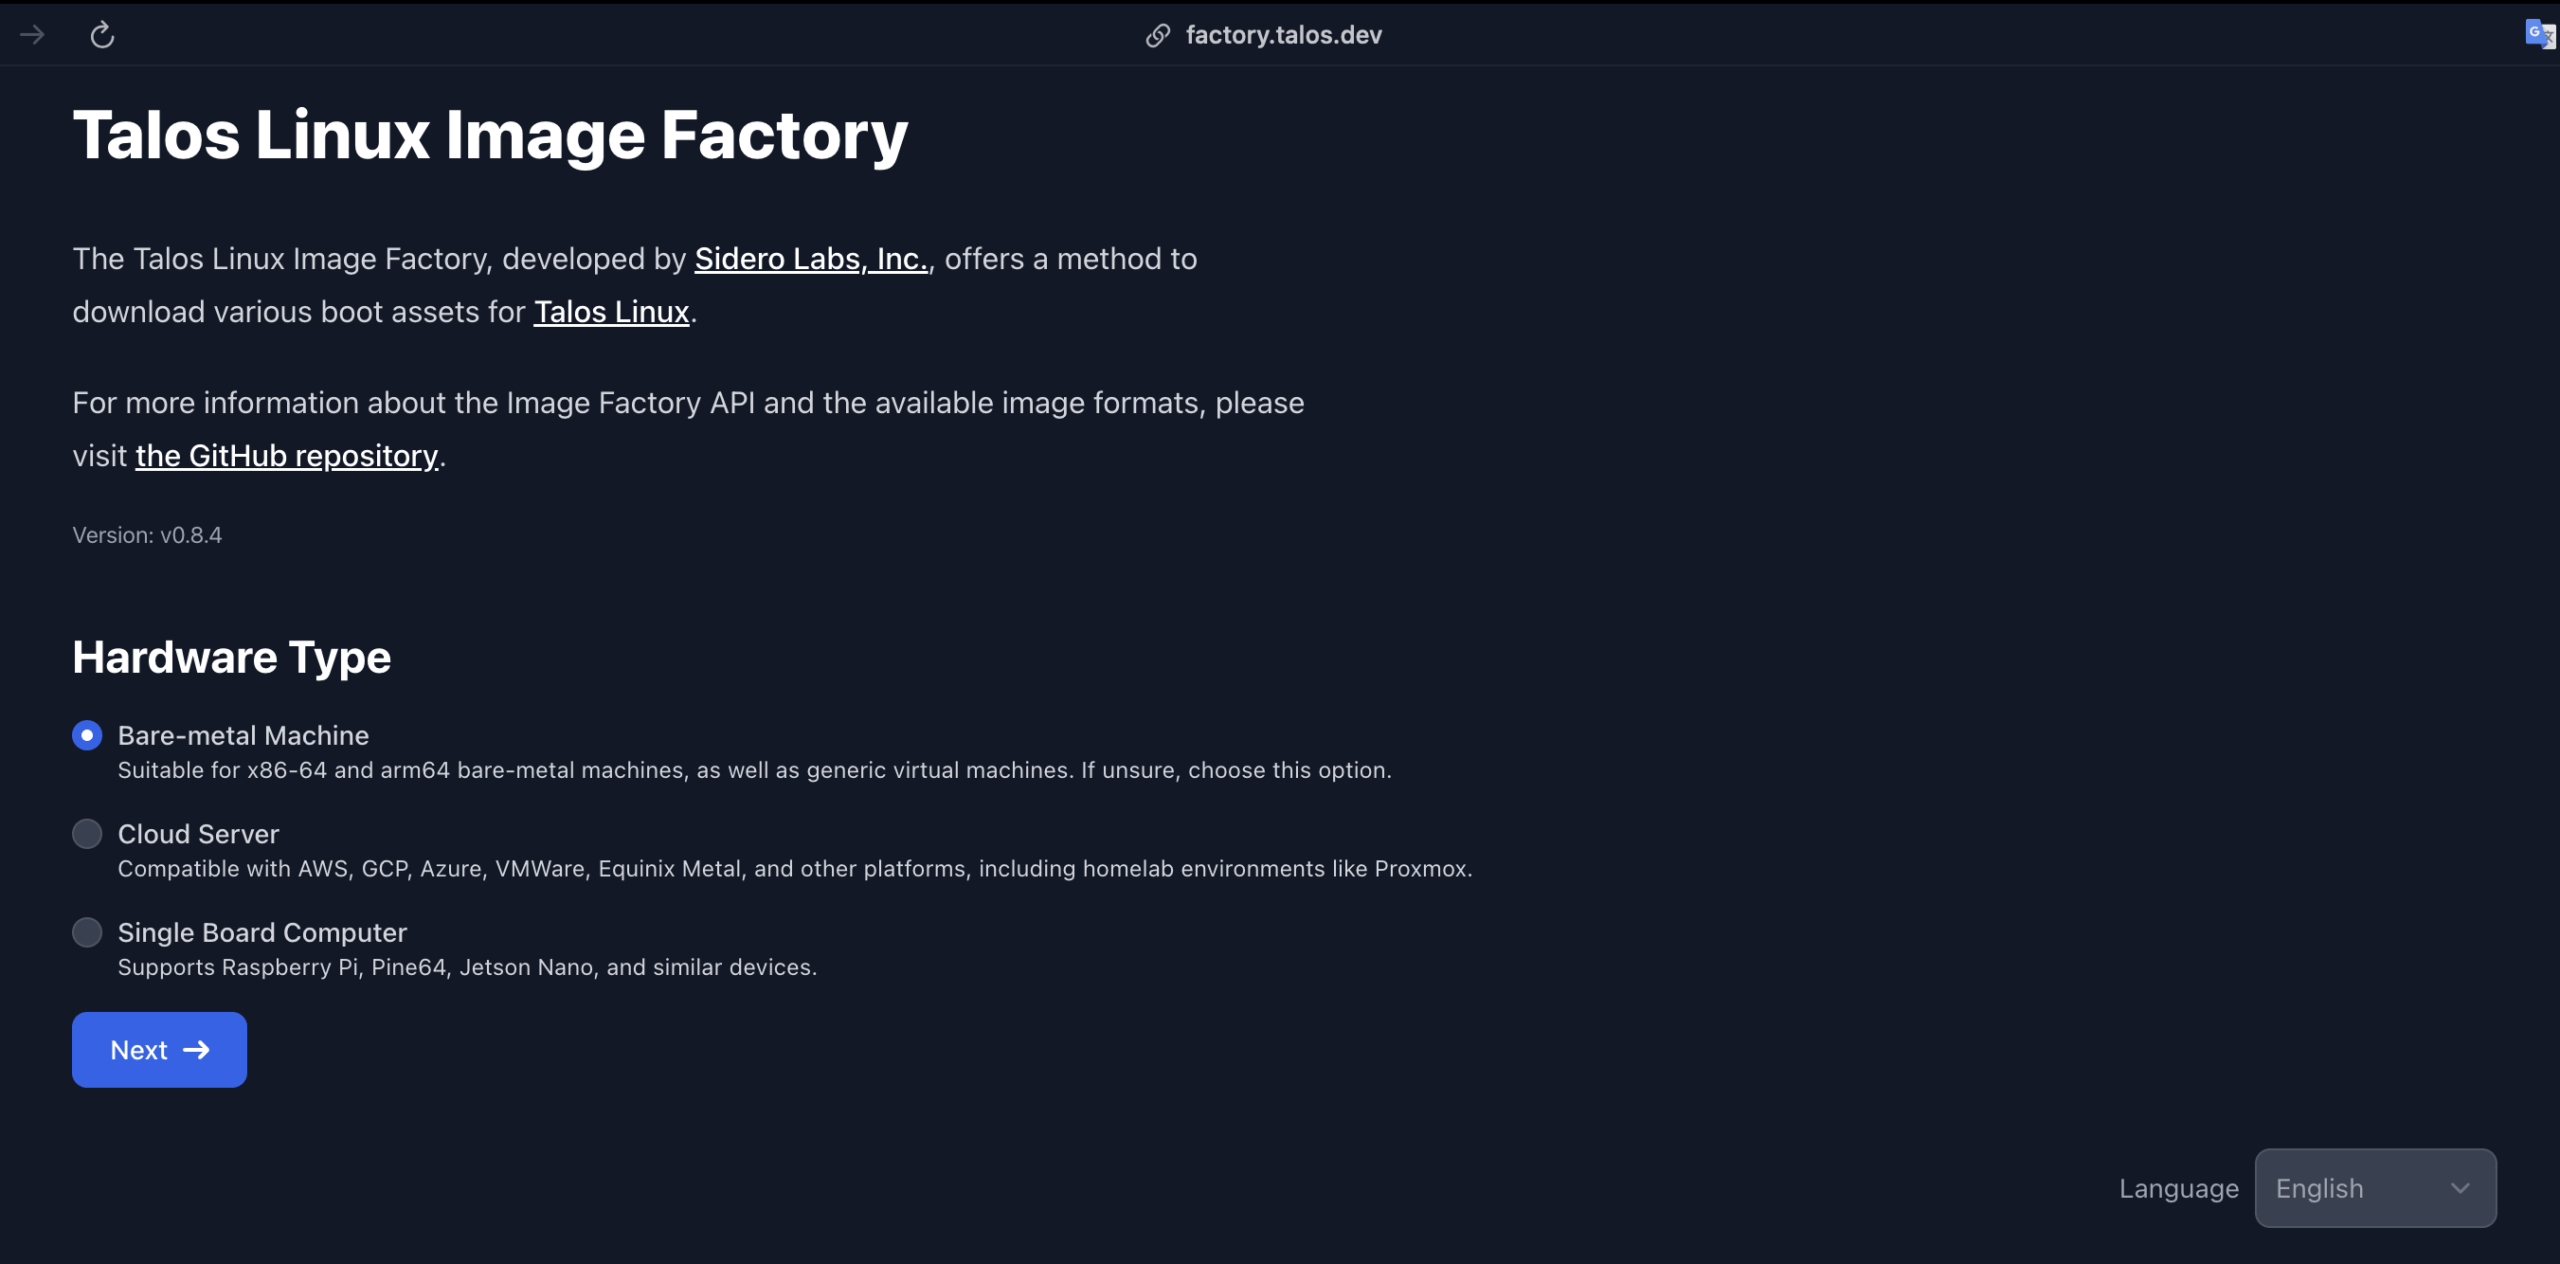
- Pick the right architecture for your machine. For me, I will use
amd64 - Talos provides a lot of extensions that you can use. You can pick the ones that you need. For me, I will pick
siderolabs/gvisor,siderolabs/iscsi-tools, andsiderolabs/util-linux-tools. - If you’re using an older Talos version, you need to add
net.ifnames=0to the extra kernel args to make sure that the network interface is namedeth0instead ofens18or something else - After everything is complete, it will show you a some links and a schematics/hash of your choice. For example
efb7577422715f84c716c3d30fee60858fb093841d1d539ca5db92ae99737bf8
The download URL is generated based on the schematics and the versions. So based on our configurations it would be generated tofactory.talos.dev/metal-installer/[schematics]:[version]# Will be generated tofactory.talos.dev/metal-installer/efb7577422715f84c716c3d30fee60858fb093841d1d539ca5db92ae99737bf8:v1.11.1 - Click on local-lvm and copy the ISO link generated by the Talos factory
- Go to the Proxmox web interface and create a new VM
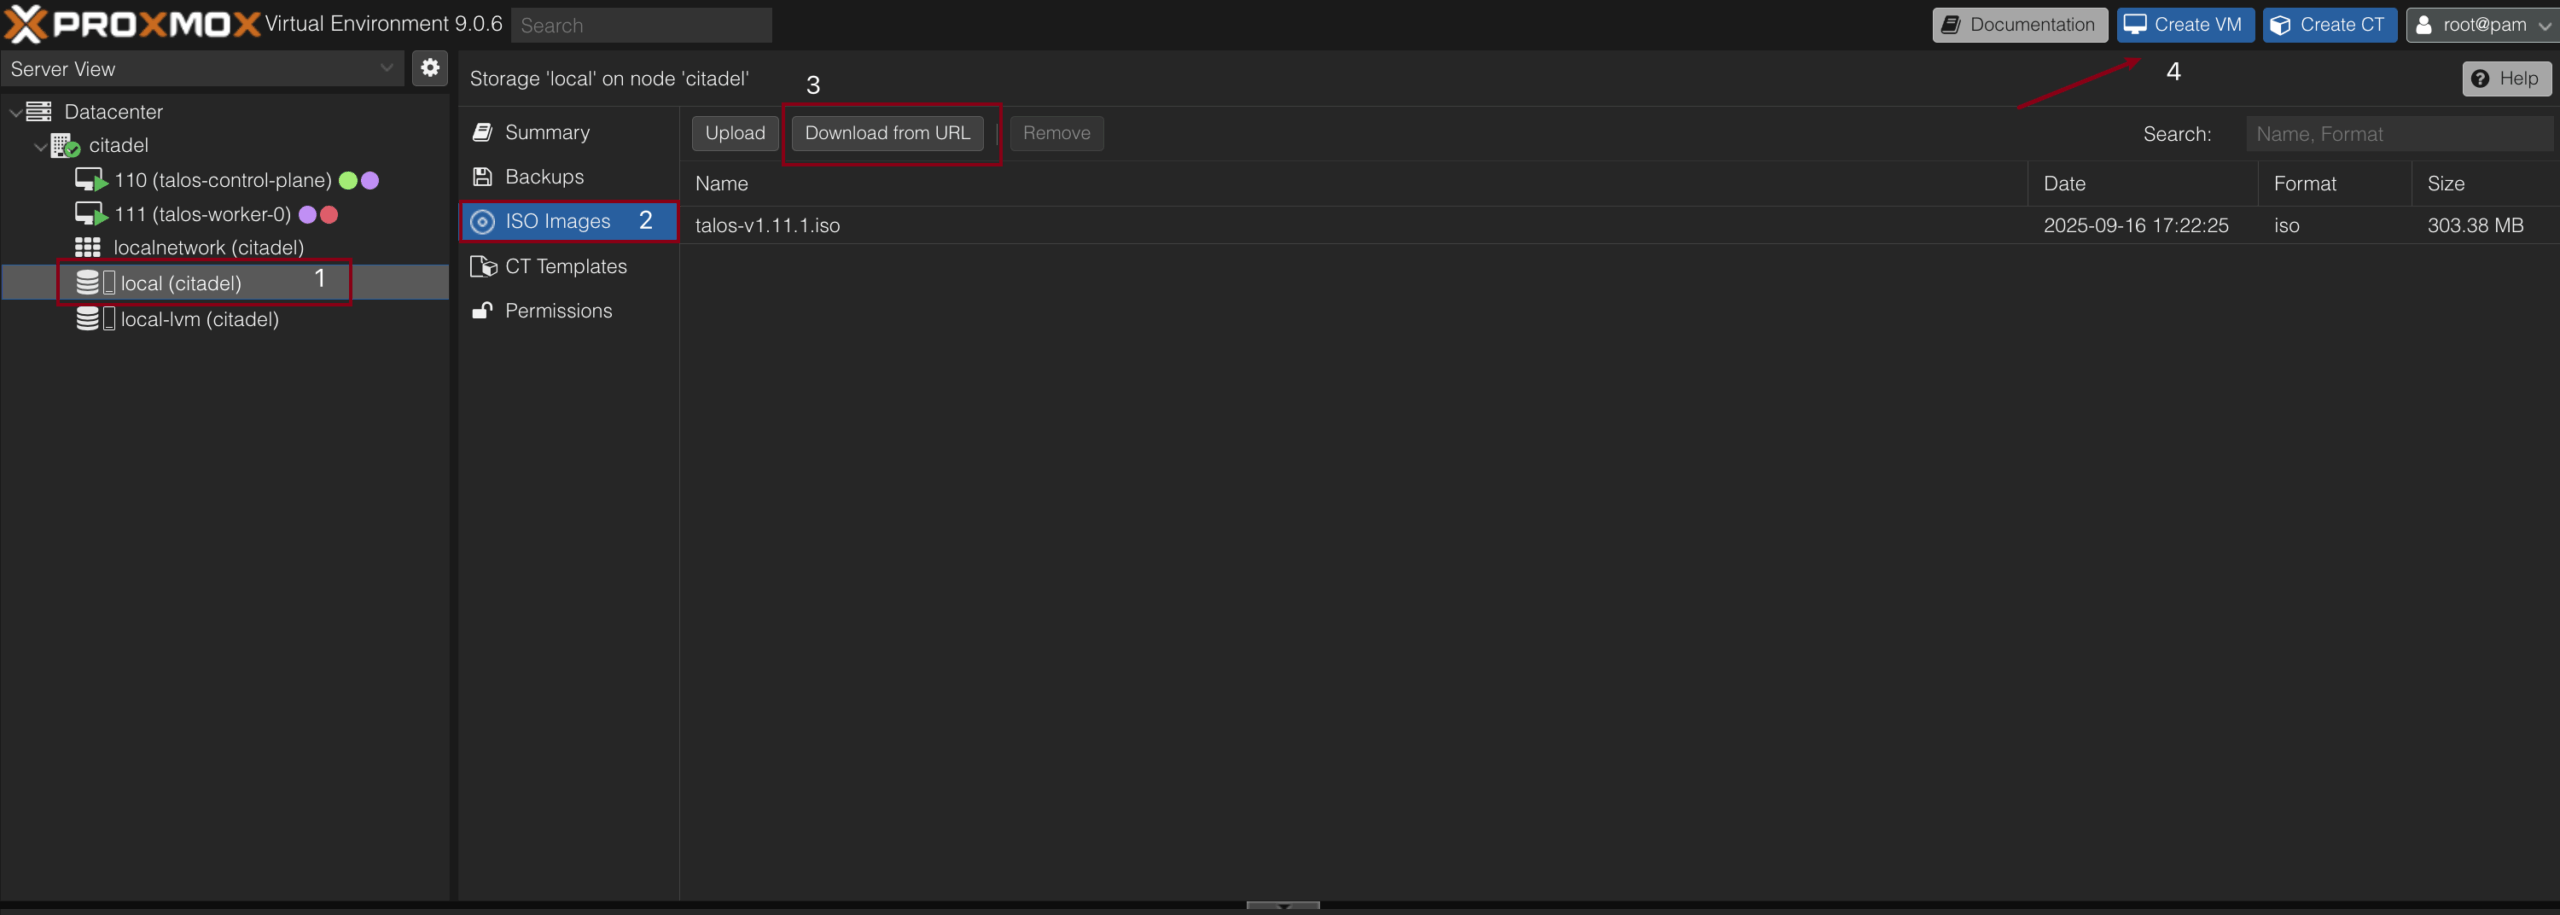
- Pick any name that you want. We will create 2 VMs: 1 for control-plane and 1 for worker, so I will name them
talos-control-planeandtalos-worker1 - In the OS section, choose the ISO that you have downloaded previously
- In the System section, you can leave it as default
- In the Hard Disk section, you can allocate 20GB or more for the disk size
- In the CPU section, make sure the type is
x86-64-v2-AESand you can allocate 2 cores or more. I will choose 2 cores - For Memory, you can allocate 2048MB or more. I will choose 4096MB
- In the Network section, leave it as default and click finish
Tip:
- Since Talos is very minimal, the storage system in Kubernetes is not included by default. So if you want to use storage in your Kubernetes cluster, you need to install
siderolabs/util-linux-toolsandsiderolabs/iscsi-toolsextensions- If you want to have a static IP for the OS, you need to choose
Cloud Serverand pickNoCloud. In this guide, I choose bare-metal since it is the simplest one- You can directly click this link to download the same image as mine
- You can see the detailed guide in Talos Official Documentation
Wait until it’s finished booting and you should see this. The status should be Maintenance.
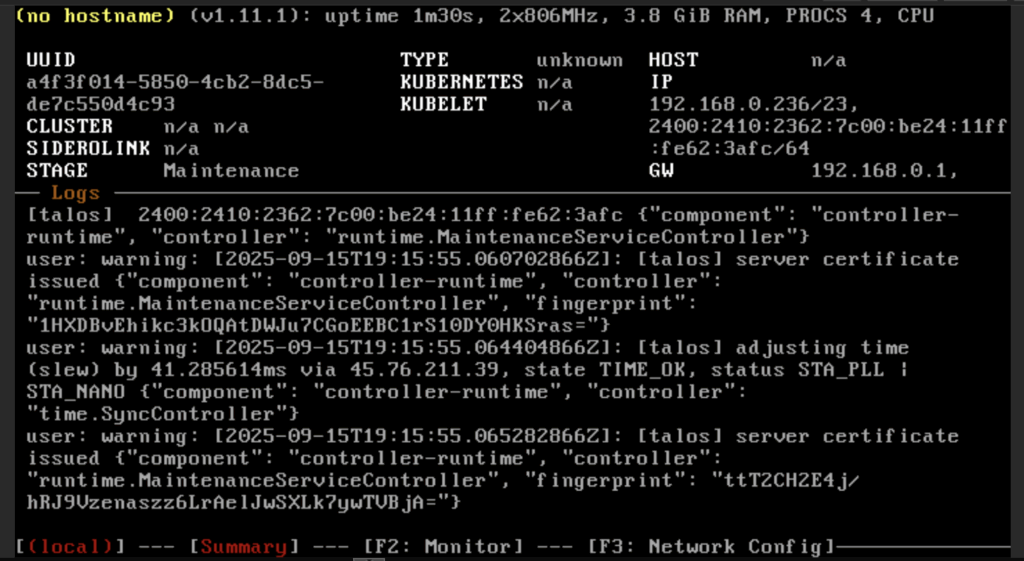
Warning: You need to do this step twice: 1 for control-plane and 1 for worker
Installing via Terraform
I want to use Terraform to manage my Proxmox. This section is completely optional – you can skip it and go straight to configuring Talos. To use Terraform in Proxmox, we need to create a user in Proxmox that has a specific role attached to it. After the user has been created, we will create a token specific for that user and use it in Terraform.
Proxmox Terraform User Setup
We need to go to the shell in the root of our Proxmox datacenter.
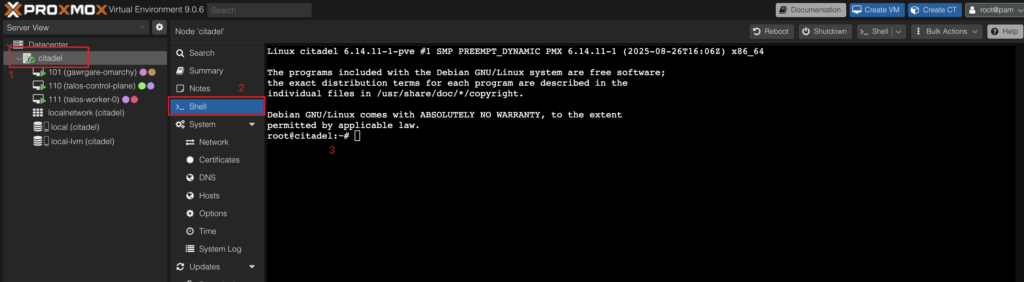
- Create a user for Terraform in Proxmox
pveum user add terraform@pve- Create a role for the user
pveum role add Terraform -privs "Realm.AllocateUser, VM.PowerMgmt, VM.GuestAgent.Unrestricted, Sys.Console, Sys.Audit, Sys.AccessNetwork, VM.Config.Cloudinit, VM.Replicate, Pool.Allocate, SDN.Audit, Realm.Allocate, SDN.Use, Mapping.Modify, VM.Config.Memory, VM.GuestAgent.FileSystemMgmt, VM.Allocate, SDN.Allocate, VM.Console, VM.Clone, VM.Backup, Datastore.AllocateTemplate, VM.Snapshot, VM.Config.Network, Sys.Incoming, Sys.Modify, VM.Snapshot.Rollback, VM.Config.Disk, Datastore.Allocate, VM.Config.CPU, VM.Config.CDROM, Group.Allocate, Datastore.Audit, VM.Migrate, VM.GuestAgent.FileWrite, Mapping.Use, Datastore.AllocateSpace, Sys.Syslog, VM.Config.Options, Pool.Audit, User.Modify, VM.Config.HWType, VM.Audit, Sys.PowerMgmt, VM.GuestAgent.Audit, Mapping.Audit, VM.GuestAgent.FileRead, Permissions.Modify"- Assign the role to the user
pveum aclmod / -user terraform@pve -role Terraform- Get the token
pveum user token add terraform@pve provider --privsep=0You will get something like this. Copy the value of the token and save it somewhere
│ key          │ value                                │
╞══════════════╪══════════════════════════════════════╡
│ full-tokenid │ terraform@pve!provider               │
├──────────────┼──────────────────────────────────────┤
│ info         │ {"privsep":"0"}                      │
├──────────────┼──────────────────────────────────────┤
│ value        │ xxxxxxxx-xxxx-xxxx-xxxx-xxxxxxxxxxxx |
terraform@pve!provider=xxxxxxxx-xxxx-xxxx-xxxx-xxxxxxxxxxxxTerraform Files
- Create an empty directory and add the Proxmox providers. We will call this file
versions.tf
terraform {
  required_providers {
    proxmox = {
      source  = "bpg/proxmox"
      version = "0.83.0"
    }
  }
}- After that, install the providers using
terraform init -upgradeto install providers in the local directory - Add configurations for the Proxmox providers in a file called
providers.tf
provider "proxmox" {
  endpoint  = var.proxmox_endpoint
  api_token = var.proxmox_api_token
  insecure  = true

  ssh {
    agent    = false
    username = var.proxmox_username
    password = var.proxmox_password
  }
}- Add a file called
variables.tf. This file will be kind of our.envfile for these configurations
variable "proxmox_endpoint" {
  type        = string
  description = "The endpoint for the Proxmox Virtual Environment API (example: https://host:port)"
  sensitive   = true
}

variable "proxmox_api_token" {
  type        = string
  description = "The token for the Proxmox Virtual Environment API"
  sensitive   = true
}

variable "proxmox_username" {
  type        = string
  description = "The username for the Proxmox Virtual Environment API"
  sensitive   = true
}

variable "proxmox_password" {
  type        = string
  description = "The password for the Proxmox Virtual Environment API"
  sensitive   = true
}

variable "proxmox_node_name" {
  type        = string
  description = "The node name for the Proxmox Virtual Environment API"
  default     = "pve"
}

variable "proxmox_datastore_id" {
  type        = string
  description = "Datastore for VM disks"
  default     = "local-lvm"
}- Create a file called
.auto.tfvarsto fill our variable configurations. This is my example of the configurations
proxmox_endpoint  = "https://192.168.1.2:8006/"
proxmox_api_token = "terraform@pve!provider=3f2c9ecb-xxxx-xxxx-xxxx-xxxxxxxxxxxx"
proxmox_node_name = "citadel"
proxmox_username  = "root"
proxmox_password = "gawrgare"- Now it’s time to add the Proxmox-related Terraform configurations in the
talos.tffile
locals {
  nodes = {
    "talos-control-plane" = {
      "node_name" = var.proxmox_node_name
      "vm_id"     = 110
      "cpu"       = 2
      "tags"      = ["kubernetes", "control-plane"]
    }
    "talos-worker-0" = {
      "node_name" = var.proxmox_node_name
      "vm_id"     = 111
      "cpu"       = 2
      "tags"      = ["kubernetes", "worker"]
    }
  }

  bootable = {
    type      = "iso"
    file_name = "talos-v1.11.1.iso"
    url       = "https://factory.talos.dev/image/efb7577422715f84c716c3d30fee60858fb093841d1d539ca5db92ae99737bf8/v1.11.1/metal-amd64.iso"
  }
}

resource "proxmox_virtual_environment_download_file" "talos_image" {
  content_type = local.bootable.type
  datastore_id = "local"
  node_name    = var.proxmox_node_name
  file_name    = local.bootable.file_name

  url = local.bootable.url
}

resource "proxmox_virtual_environment_vm" "talos" {
  for_each = local.nodes
  tags     = each.value.tags

  name        = each.key
  node_name   = each.value.node_name
  vm_id       = each.value.vm_id
  bios        = "seabios"
  description = "Managed by Terraform"
  started     = false
  template    = false

  agent {
    enabled = true
  }

  cpu {
    cores = each.value.cpu
    type  = "x86-64-v2-AES"
  }

  memory {
    dedicated = 4096
  }

  disk {
    datastore_id = var.proxmox_datastore_id
    file_id      = proxmox_virtual_environment_download_file.talos_image.id
    interface    = "scsi0"
    iothread     = true
    discard      = "on"
    size         = 100
  }

  initialization {
    ip_config {
      ipv4 {
        address = "dhcp"
      }
    }
  }

  network_device {
    bridge = "vmbr0"
  }
}
What the code blocks will do:
- It creates a locals variable that adds two nodes:
control-planeandworker - We will use
proxmox_virtual_download_fileto download the.isofiles and keep them in ourProxmoxstorage. You can change theURLbased on yourschematics - We will create a VM with the following configurations:
- 100GB of disk
- Dynamic IP Address
- 2 Cores CPU
- 4 GB of RAM
- QEMU Agent Enabled
Tip:
- Please refer to the official Terraform documentation for detailed configurations. I set
started = falsebecause sometimes the Terraform state will get stuck, so we need to turn on the VM manually.- You can Configure Talos using Terraform too with this Talos Providers, but I will do it manually in this article
Configure Talos
- We need to install
talosctlto configure our cluster. Since I’m on macOS, I will be using brew for this. For other OS, you can see the official documentation
brew install siderolabs/tap/sidero-tools- We will need to export variables for
CONTROL_PLANEandWORKER_IP
export CONTROL_PLANE_IP=(your IP)
export WORKER_IP=(your worker IP)- We will generate config using
talosctl gen config
talosctl gen config talos-proxmox-cluster https://$CONTROL_PLANE_IP:6443 --output-dir _out --install-image factory.talos.dev/installer/efb7577422715f84c716c3d30fee60858fb093841d1d539ca5db92ae99737bf8:v1.11.1What does this command do? It will generate a Talos cluster config with the
- Cluster Name of:
talos-proxmox-cluster - Control Plane Address:
https://$CONTROL_PLANE_IP:6443 - Will output the result in
_outdirectory - It will generate the config based on the our choice of ISO (please make sure that the instal-image argument have the same link as the one you use when installing the talos)
- Now we need to export the variable
TALOSCONFIG
export TALOSCONFIG="_out/talosconfig"- Now we need to apply our generated configurations to our cluster on both the Control Plane and Worker
talosctl --talosconfig $TALOSCONFIG apply-config --insecure --nodes $CONTROL_PLANE_IP --file _out/controlplane.yamlApply again for our worker
talosctl --talosconfig $TALOSCONFIG apply-config --insecure --nodes $WORKER_IP --file _out/worker.yaml- Finally, we can set the information about our node endpoint and info
talosctl --talosconfig $TALOSCONFIG config endpoint $CONTROL_PLANE_IP
talosctl --talosconfig $TALOSCONFIG config node $CONTROL_PLANE_IP
talosctl --talosconfig $TALOSCONFIG config info
If it’s configured correctly, it will show something like this
Current context:     talos-proxmox-cluster
Nodes:               192.168.1.57
Endpoints:           192.168.1.57
Roles:               os:admin
Certificate expires: 11 months from now (2026-09-16)
- Finally, we can apply all of the current configurations and bootstrap the cluster using these commands
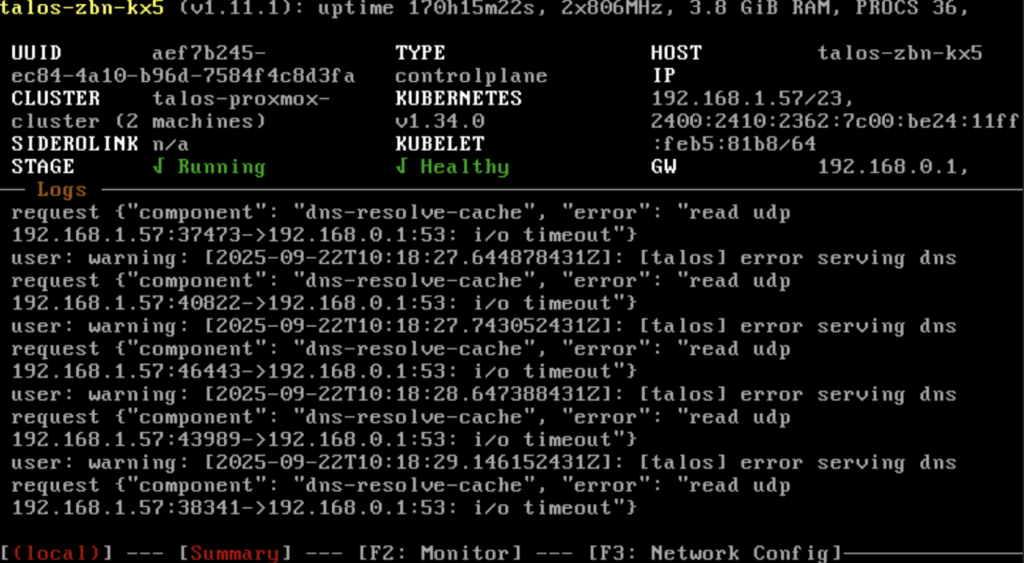
talosctl --talosconfig $TALOSCONFIG bootstrapThe OS will restart and the stage will move to BOOTING state
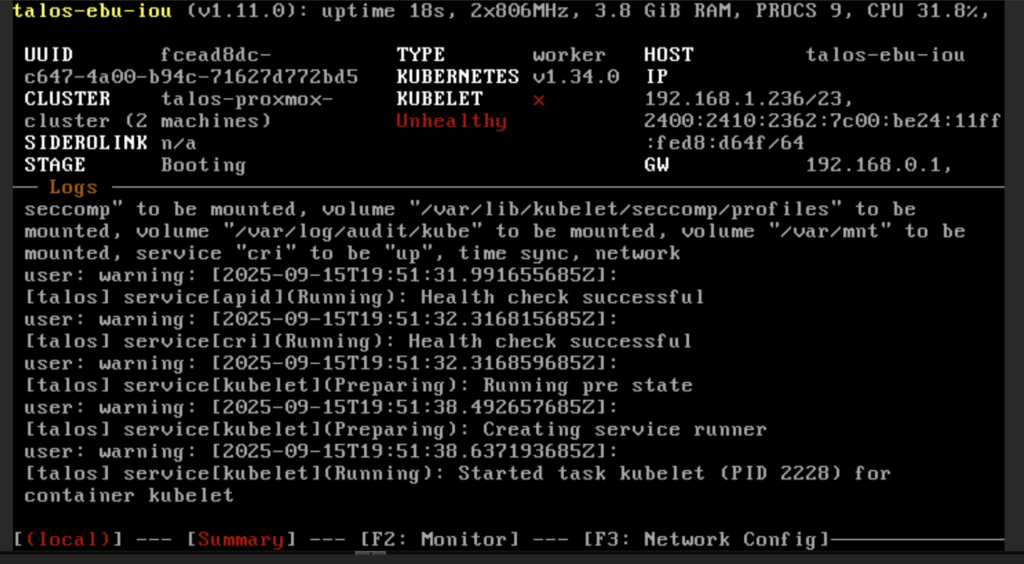
Wait until the stage is RUNNING and KUBELET is HEALTHY
Configuring Kubernetes
After the kubelet is healthy, now we can get the kubeconfig for our cluster
talosctl --talosconfig $TALOSCONFIG kubeconfigUsually, our kubectl will search for the kubeconfig via the KUBECONFIG environment variable and will fall back to ~/.kube/config
The kubeconfig file will contain the configurations for our cluster. We can add it in two ways:
- Add using environment variable
export KUBECONFIG=(PATH_TO_CLUSTER_KUBECONFIG)- Merge the generated
kubeconfigand~/.kube/config.
I prefer option 2 since it taught me a lot about how kubeconfig works under the hood.
Verify the correctness using kubectl config get-contexts. You should see the talos cluster there
Switch the context to use our cluster configurations by using
kubectl config use-context admin@talos-proxmox-clusterNow try to get all node information by using
kubectl get nodes -o wideYou should see the information about our nodes in the cluster
NAME            STATUS   ROLES           AGE   VERSION   INTERNAL-IP     EXTERNAL-IP   OS-IMAGE          KERNEL-VERSION   CONTAINER-RUNTIME
talos-dgk-fip   Ready    <none>          12d   v1.34.0   192.168.1.133   <none>        Talos (v1.11.1)   6.12.45-talos    containerd://2.1.4
talos-zbn-kx5   Ready    control-plane   12d   v1.34.0   192.168.1.57    <none>        Talos (v1.11.1)   6.12.45-talos    containerd://2.1.4
Deploying Nginx pod
After the setup is completed, we want to test our cluster behavior by deploying an nginx pod. Create a pod.yaml file with this content
apiVersion: v1
kind: Pod
metadata:
  name: nginx-pod
  labels:
    app: nginx
spec:
  containers:
    - name: nginx-container
      image: nginx:latest
      ports:
        - containerPort: 80
Now apply the pod using these commands
kubectl apply -f pod.yamlVerify by using curl inside localhost
kubectl exec pod/nginx-pod -- curl localhost<html>
<head>
<title>Welcome to nginx!</title>
<style>
html { color-scheme: light dark; }
body { width: 35em; margin: 0 auto;
font-family: Tahoma, Verdana, Arial, sans-serif; }
</style>
</head>
<body>
<h1>Welcome to nginx!</h1>
<p>If you see this page, the nginx web server is successfully installed and
working. Further configuration is required.</p>
<p>For online documentation and support please refer to
<a href="http://nginx.org/">nginx.org</a>.<br/>
Commercial support is available at
<a href="http://nginx.com/">nginx.com</a>.</p>
<p><em>Thank you for using nginx.</em></p>
</body>
</html>Neat! Now our cluster is working properly and well! Don’t forget to remove the nginx by using
kubectl delete -f pod.yamlFAQ
Upgrading talos linux
When you want to upgrade Talos Linux, you can use these commands
talosctl --talosconfig talosconfig upgrade --image factory.talos.dev/metal-installer/<SCHEMATICS>:v1.11.1 --nodes 192.168.1.144,192.168.1.117 --preserveHow to access this outside of our home network
I use Tailscale for this. It’s a VPN service that creates a secure mesh network between all your devices. You can register your Proxmox VM as a Tailscale node, then SSH into it from anywhere and run kubectl commands.
Alternative approach: You can set up your Proxmox VM as a subnet router to forward network traffic directly to your cluster.
I tried to create a stateful set but got an error
By default, Talos OS doesn’t have a Storage Class. See the documentation for the details. But since we already installed some of the
iscsi-toolsas our extensions, we can directly install it by addinglonghorn.yaml
machine:
  kubelet:
    extraMounts:
      - destination: /var/lib/longhorn
        type: bind
        source: /var/lib/longhorn
        options:
          - bind
          - rshared
          - rw
And then patch our current cluster by using these commands with 192.168.1.57,192.168.1.133 being the IPs of our cluster nodes
talosctl --talosconfig talosconfig patch machineconfig -p @longhorn.yaml -n 192.168.1.57,192.168.1.133Final Thoughts
With this project, I learned a lot:
- How kubectl determine configuration to use (Kubeconfig)
- Storage systems in Kubernetes
- How Proxmox works
- How to set up our own Kubernetes cluster
After completing this, Finally i can setup my own Obsidian LiveSync in my Kubernetes cluster 😀
I hope this guide is helpful to you! Don’t hesitate to reach out to me on LinkedIn if you have any questions. All of the code can be found in my citadel repository.