
Hello! I am Kinon, an Indonesian Software Engineer at ID Platform of Money Forward’s Business Platform Development. During my 10 months working fullstack in this team, I noticed a pattern in our configuration management workflow that could benefit from automation. Today, I’d like to share my experience creating a Proof of Concept (PoC) that bridges Google Sheets and GitHub API to automate issue creation and pull request generation.
1. Background
This PoC demonstrates an automation system that leverages GitHub API to create Issues and Pull Requests from Google Sheets scripts. Let me break down the key components and motivations behind this approach.
Components
- Google Sheets serves as our central data collection hub, offering flexibility through Google Forms, Slack Workflows, or direct edits. Its accessibility allows both technical and non-technical team members to interact with the same interface comfortably.
- Google Apps Script acts as the automation brain, processing data and making API calls while handling various triggers. Its integration with Google Workspace products makes it ideal for transforming form submissions into properly formatted API requests with built-in error handling and logging.
- GitHub API forms the execution layer, with the Issues API being straightforward for tracking, while the Pull Request API requires orchestrated steps: creating trees, managing branches, commits, and pull requests with proper error handling.
Motivation
- Improved Traceability & Error Reduction: Manual issue linking and repetitive configuration changes were becoming bottlenecks prone to human error. Automation ensures consistent documentation, maintains cross-references automatically, and shifts engineers’ focus from creation to review where their expertise adds more value.
- Seamless Workflow Integration: The system integrates with various input sources and can trigger subsequent pipelines – from CI tests to reviewer assignments and team notifications, creating automated action chains from single form submissions.
- Technical Bridge: This system bridges the gap between teams, allowing non-engineering members to request changes through familiar interfaces while maintaining technical correctness. The automation standardizes requests into proper GitHub operations, maintaining both usability and technical accuracy.
- Separation of Concerns: Some of you may ask, why not implement a table in the database that stores these data in the sheets, then implement a feature for internal use on editing and doing something with the data? The answer is sometimes there are types of data that should be separated and not exist in the database, but in the codebase instead. This creates clear separation between feature implementations (database changes) and configuration management (codebase modifications).
In the following sections, I’ll walk us through how I set up this system using Google Apps Script and integrated it with GitHub’s API. We’ll explore both the technical implementation and the practical considerations that made this automation successful.
2. Setting Up Google App Scripts
After understanding the components and motivation of our automation system, let’s dive into the actual implementation. Let’s walk through how I set up this automation, from data collection to script execution, sharing some useful tips I learned along the way.
Creating Data Collection Flow
For our automation to work, we first need structured data. I chose Google Forms as our input interface because it provides a clean way to collect standardized information. In my case, I created fields for Product Name, Product Code, Base URLs, and API endpoints – all the information needed to generate our issues and pull requests.
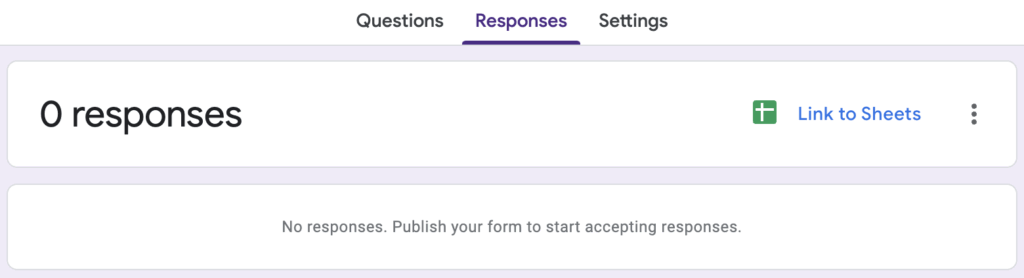
When linked to a Google Sheet, each form submission creates a new row where columns correspond to the questions. This creates a perfect data structure for our automation, and more importantly, provides a familiar interface for team members who might not be comfortable with GitHub directly.
Configuring Apps Script
With our data collection in place, the next step is adding Google Apps Script to our sheet through the Extensions menu. This is where the magic happens – we’ll write the logic that transforms our form submissions into GitHub issues and pull requests.
The script’s entry point looks like this:
function onFormSubmit(e) {
  const values = (e && e.values) ?
    getRowAsObject(e.values) :
    getLastRowAsObject();
  // Rest of our automation logic
}
One thing that took me some time to figure out was permissions. Google Apps Script needs explicit permission to make external API calls to GitHub. We can grant this by adding OAuth scopes in our appsscript.json:
{
  "timeZone": "Asia/Tokyo",
  "dependencies": {},
  "oauthScopes": [
    "https://www.googleapis.com/auth/spreadsheets",
    "https://www.googleapis.com/auth/script.external_request"
  ]
}
The final piece is setting up triggers in the Apps Script dashboard. This tells our script when to run – in our case, whenever a form response is submitted. This creates the automatic workflow we’re aiming for.
Setting Up Triggers
After writing our script, we need to tell Google Apps Script when to execute it. This is where the Triggers tab comes in handy. Think of triggers as event listeners – they watch for specific events and run our script when those events occur.
In my implementation, I set up two triggers:
- The main trigger that runs onFormSubmit whenever a new form response comes in
- A backup trigger that runs nightly to catch any missed executions
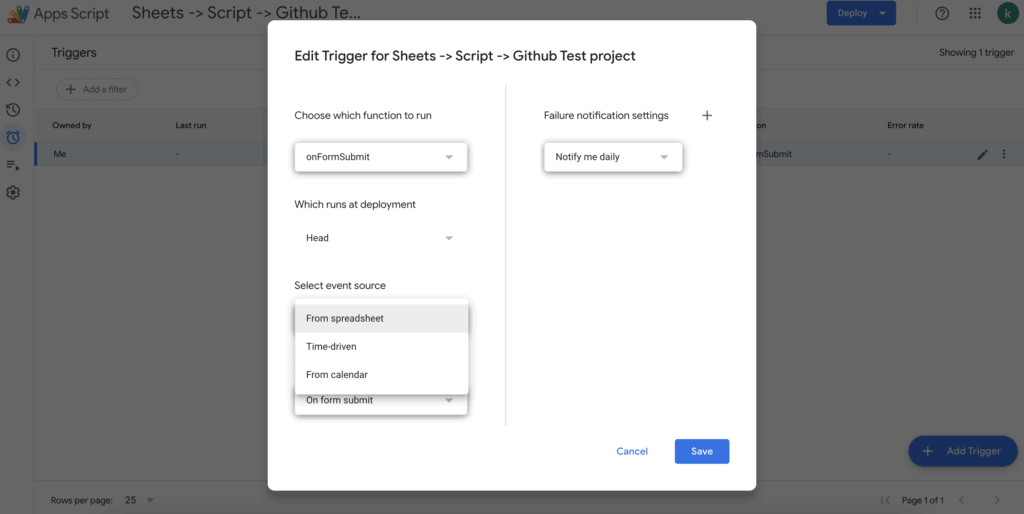
Setting up a trigger is straightforward through the Triggers tab. You can specify:
- Which function to run (in our case, onFormSubmit)
- What event triggers it (Form Submit, Time-driven, or even Calendar events)
- Where the event comes from (Spreadsheet, Forms, or Time-based)
What I particularly like about this system is its flexibility. You can have multiple triggers for different scenarios – maybe one for form submissions, another for manual sheet edits, and even scheduled runs for maintenance tasks.
Monitoring Executions
One of the most valuable features I discovered was the Executions tab. This tab shows a complete history of every time our script runs, whether triggered automatically or manually executed.
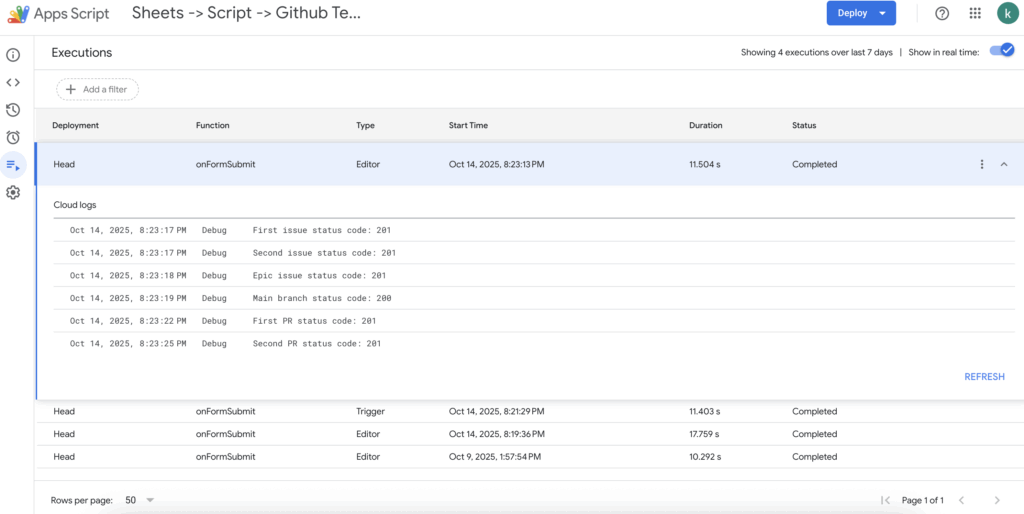
Each execution entry shows:
- When it ran
- What function (of the code) did ran
- What triggered it (
Editormeans it can be manually run/debug from the Google Apps Scripts editor, whileTriggermeans it is because of one of the triggers we set up) - How long it took
- Whether it succeeded or failed
- Detailed logs and error messages
This visibility proved invaluable during development. Remember those verbose logs I mentioned adding to our code?
console.log(`Processing request for: ${values["Product Name"]}`);
console.log(`API Response: ${response.getResponseCode()}`);
They all show up here, making it easy to track what happened in each execution. When something goes wrong, you can click into the execution to see the full stack trace and debug logs.
Development Tips
During development, I found myself constantly testing and debugging the script. Here’s a helpful pattern I developed: add a function to process the last row of our sheet. This way, you can manually test your changes without submitting new forms:
function getLastRowAsObject() {
  const sheet = SpreadsheetApp.getActiveSheet();
  const lastRow = sheet.getLastRow();
  return getRowAsObject(
    sheet.getRange(lastRow, 1, 1, sheet.getLastColumn())
      .getValues()[0]
  );
}
The execution logs in Apps Script dashboard became my best friend during development. Every run of our script, whether triggered by a form or manual execution, gets logged. I highly recommend adding verbose logging:
try {
  console.log(`Processing request for: ${values["Product Name"]}`);
  // API calls here
  console.log(`API Response: ${response.getResponseCode()}`);
} catch (error) {
  console.error('Error:', error);
  throw error;
}
These logs have saved me hours of debugging, especially when dealing with GitHub API responses. Speaking of which, in the next section, we’ll explore how to use GitHub’s API to create issues and pull requests programmatically. The API structure might seem complex at first, but I’ll show you how to break it down into manageable pieces.
Exploring the GitHub API
After setting up our Google Apps Script, let’s dive into the GitHub APIs we’ll be using. Before we start making API calls, there’s some groundwork we need to cover – from authentication to understanding how Git stores code.
Setting Up GitHub Access
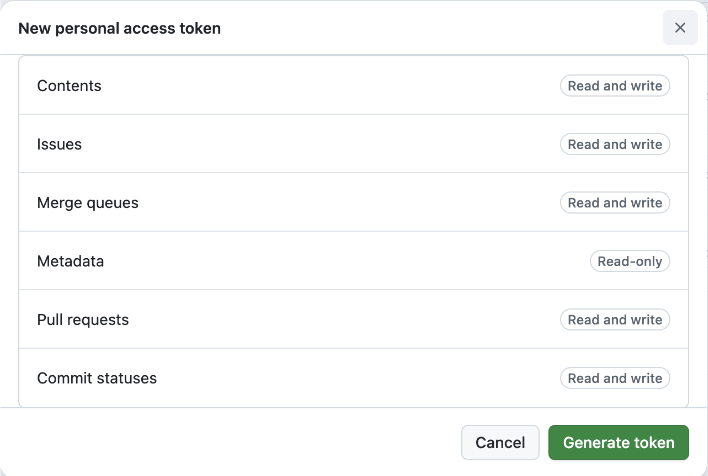
The first step in using GitHub’s API is creating a Personal Access Token (PAT). This token acts as your authentication key for all API calls. While creating a token, you can configure:
- Token expiration (30 days, 60 days, etc.)
- Repository access (specific repos or all repos)
- Required permissions:
- contents for reading and writing files
- pull_requests for creating PRs
- issues for creating issues
- commit_statuses for checking build status
- merge_queues for managing PR merges
In our automation, we’ll use this token in every API call’s header:
const headers = {
  'Authorization': `Bearer ${GITHUB_TOKEN}`
};
Creating Issues with GitHub API
The Issues API is one of the simpler endpoints we’ll work with. Creating an issue is a straightforward POST request (more details on the Issue API documentation):
UrlFetchApp.fetch(`${BASE_URL}/issues`, {
  method: 'post',
  headers,
  payload: JSON.stringify({
    title: "Issue Title",
    body: "Issue Description",
    labels: ["bug", "feature"]
  })
});
The response gives us an issue object containing the issue number, which we’ll need later when linking issues in pull request descriptions.
Understanding Git’s Internal Structure
Before diving into the API calls for Pull Request, let’s understand how Git stores code. You might think of Git as storing file differences, but it actually works more like a key-value store. Every piece of content in Git – whether it’s a file, directory, or commit – is stored as an object with a unique hash key.
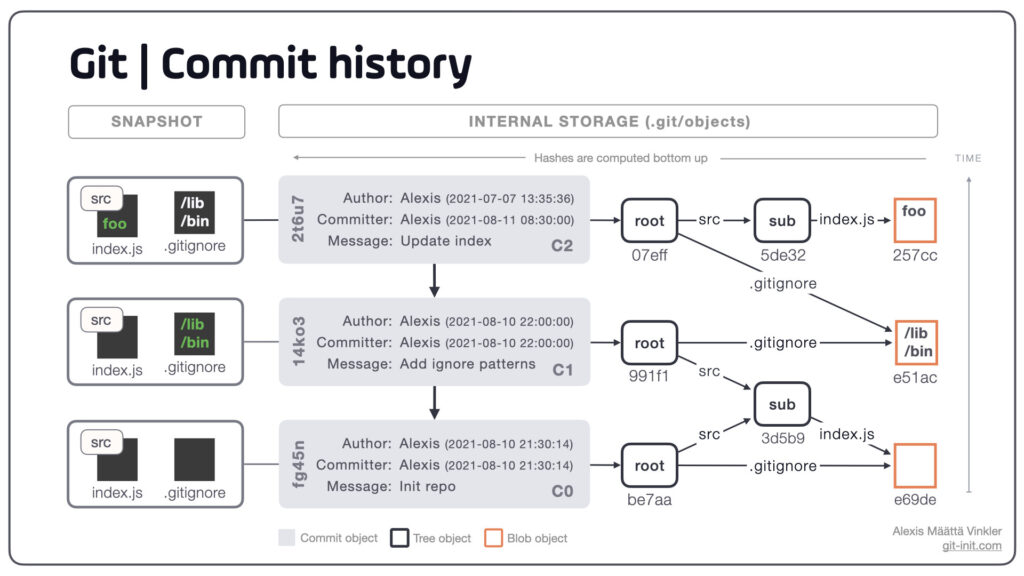
As can be observed from the image above, at its core, Git uses three main types of objects. A “blob” is the simplest – it’s just the contents of a file. A “tree” is like a directory listing, pointing to blobs (files) and other trees (subdirectories). A “commit” ties it all together, pointing to a tree that represents your project’s state at that moment. The source of the Git Storage Structure image is from an answer of A Stack Overflow question: How does Git store files. You can also explore further in a full blog about this: How does Git store files
What’s fascinating is that commits can exist without being referenced by any branch. Think of branches as simply pointers to specific commits. This understanding becomes crucial when we create pull requests, as we’ll need to:
- Create blobs for our new file contents
- Build a tree structure pointing to these blobs
- Create a commit pointing to this tree
- Finally, create a branch pointing to our commit
Creating Pull Requests – A Multi-step Journey
Creating a pull request is more complex than creating an issue – and quite fascinating once you understand the process. While the final PR creation is surprisingly simple, getting there requires several API calls that mirror Git’s internal structure we discussed earlier.
First, we need to get information about our main branch. This serves as our starting point (more details on the Branches API documentation):
const mainBranchResponse = UrlFetchApp.fetch(`${BASE_URL}/branches/main`, { headers });
const mainBranchData = JSON.parse(mainBranchResponse.getContentText());
const mainTreeSha = mainBranchData.commit.commit.tree.sha;
With the main branch’s tree SHA in hand, we can create a new tree containing our changes. The mode “100644” indicates we’re creating a regular file (as opposed to an executable or a directory) (more details on the Trees API documentation):
const newTreeResponse = UrlFetchApp.fetch(`${BASE_URL}/git/trees`, {
  method: 'post',
  headers,
  payload: JSON.stringify({
    base_tree: mainTreeSha,
    tree: [{
      path: "path/to/file.rb",
      mode: "100644",
      type: "blob",
      content: "File content here"
    }]
  })
});
Once our tree is created, we need to create a commit pointing to it. Notice how we reference both our new tree and the parent commit – this creates the Git history (more details on the Commits API documentation):
const commitResponse = UrlFetchApp.fetch(`${BASE_URL}/git/commits`, {
  method: 'post',
  headers,
  payload: JSON.stringify({
    message: "Add new feature",
    tree: newTreeSha,
    parents: [mainCommitSha]
  })
});
Now comes an interesting part – creating a reference (branch) pointing to our commit. In Git terminology, branches are just refs that start with “refs/heads/” (more details on the References API documentation):
UrlFetchApp.fetch(`${BASE_URL}/git/refs`, {
  method: 'post',
  headers,
  payload: JSON.stringify({
    ref: "refs/heads/feature-branch",
    sha: commitSha
  })
});
And finally, as funny as it seems after all that work, creating the actual pull request is the easiest part (more details on the Pull Requests API documentation):
UrlFetchApp.fetch(`${BASE_URL}/pulls`, {
  method: 'post',
  headers,
  payload: JSON.stringify({
    title: "Add new feature",
    body: "Implementation details",
    head: "feature-branch",
    base: "main"
  })
});
This sequence of API calls mirrors exactly how Git works internally – from creating content (blobs) to organizing it (trees) to tracking history (commits) to naming our changes (refs). Understanding this flow not only helps us create pull requests programmatically but also gives us a deeper appreciation of Git’s design.
Patterns and Tips for GitHub Automation
Now you have the necessary building blocks to create your own logic and integrate issue/PR creation. In this section, I want to talk about some patterns I encountered that helped me achieve my desired requirements.
Managing File Content Generation
One of the first challenges I faced was how to generate file content. I explored several approaches, each with its own trade-offs:
Template Files in Repository
My preferred approach was storing template files in the GitHub repository itself. For example, I kept issue templates in .github/ISSUE_TEMPLATE/ and used them like this:
const templateContent = UrlFetchApp.fetch(
  'https://raw.githubusercontent.com/org/repo/main/templates/config.rb',
  { headers }
).getContentText();

const generatedContent = templateContent
  .replace('<PRODUCT_NAME>', values["Product Name"])
  .replace('<API_URL>', values["Base URL"]);
This approach has several benefits:
- Separation of concerns – templates live with the code they generate
- Version control for templates
- Easy updates without deploying scripts
- Templates can be reviewed in pull requests
Hardcoded Content in Apps Script
While simpler to implement, hardcoding templates in the script itself has drawbacks:
const template = `
def config_for_<PRODUCT>
  {
    base_url: '<URL>',
    timeout: 30
  }
end`;
This requires script redeployment for template changes and mixes content with logic.
Content in Spreadsheet Cells
Although possible to store templates in spreadsheet cells, this approach muddles the line between data and templates:
// Don't do this
const template = sheet.getRange('TemplateCell').getValue();
Configuration Insertion Strategy
When modifying configuration files, I found the simplest approach was adding new entries at the top of their respective sections. For example, when adding to a list of services:
// Search for section header
const sectionMatch = content.match(/### Services List ###\n/);
if (sectionMatch) {
  // Insert right after the header
  const insertPosition = sectionMatch.index + sectionMatch[0].length;
  return content.slice(0, insertPosition) +
         newService + '\n' +
         content.slice(insertPosition);
}
Supporting Form Updates
An interesting challenge was handling form updates rather than just new submissions. I implemented this by:
Storing Issue IDs
// After creating issues, store IDs in hidden columns
sheet.getRange(rowNumber, epicColumn).setValue(epicIssue.number);
This allows us to check if we're updating an existing submission:

const existingIssueId = values["Epic Issue ID"];
if (existingIssueId) {
  // Update existing issue
} else {
  // Create new issue
}
Branch Naming Strategy
const branchName = `add-${values["Product Code"].toLowerCase()}-config`;Using consistent, deterministic branch names lets us check if a branch exists and reuse it for updates.
Future Possibilities
The foundation we’ve built opens doors to many exciting possibilities. Here are three directions that could take this automation to the next level:
AI Integration
While not implemented yet, an exciting possibility is integrating AI between the Apps Script and GitHub API. Imagine:
const aiResponse = await openai.createCompletion({
  model: "gpt-4",
  prompt: `Given the repository structure and this new service:
    Name: ${values["Product Name"]}
    URL: ${values["Base URL"]}
    Generate appropriate configuration changes...`
});
The AI could:
- Generate appropriate configuration entries
- Suggest file locations for new services
- Validate changes against existing patterns
- Generate commit messages and PR descriptions
This would make the automation even more powerful while maintaining consistency with existing code patterns. These patterns evolved through practical use, and I’m sure there are many more improvements possible. The key is finding the right balance between automation flexibility and maintainability.
Different Angles of Automation
Beyond issues and pull requests, GitHub’s API offers numerous other automation opportunities. We could automate GitHub comments and reviews, integrate with dependency managers like Dependabot for automated security updates, manage projects across multiple repositories within an organization, or even coordinate cross-team workflows. The possibilities extend to managing release cycles, automating documentation updates, and creating sophisticated CI/CD orchestration.
Beyond Automation – Enhanced Developer Experience
Instead of just automating existing processes, we could create entirely new experiences. Imagine building a wrapper or plugin that offers enhanced Git experiences to developers – perhaps a tool that provides intelligent conflict resolution suggestions, visualizes complex branching strategies, or offers context-aware code suggestions based on repository patterns. The goal would be to not just automate repetitive tasks, but to fundamentally improve how developers interact with Git and GitHub.
These patterns evolved through practical use, and I’m sure there are many more improvements possible. The key is finding the right balance between automation flexibility and maintainability.
Afterwords
I hope this blog has shown you the possibilities of automating GitHub workflows using Google Apps Script. What started as a simple desire to reduce repetitive tasks turned into an exploration of both platforms’ APIs and a deeper understanding of Git’s internal workings. The journey from manually creating issues and PRs to having them automatically generated from a form submission has been both challenging and rewarding.
Remember, automation isn’t just about saving time – it’s about reducing human error, maintaining consistency, and letting developers focus on what they do best: solving problems. Whether you’re managing configurations, handling deployments, or coordinating team workflows, I hope this blog gives you ideas for your own automation journey.
Happy automating!